Ultimate Guide to Creality Ender 7 Filament Sensor

Ultimate Guide to Creality Ender 7 Filament Sensor

Imagine a 3D printing world where interruptions due to filament runout are a thing of the past. Welcome to the realm of the Creality Ender-7, a groundbreaking 3D printer that combines speed, precision, and versatility. With its high-speed printing capabilities, generous build volume, and compatibility with various filaments, the Ender-7 sets a new standard in the world of additive manufacturing.

And to complement its impressive features, the Creality Ender 7 Filament Sensor steps in as a crucial ally, ensuring seamless printing experiences by preventing filament shortages. Let’s dive deep into the world of the Ender-7 and its filament sensor to see how they can revolutionize your 3D printing journey.

Key Features of the Creality Ender-7 3D Printer

The Creality Ender-7 is a filament-based 3D printer from Creality, known for its impressive features. Let’s dive into what makes it stand out:

  1. High-Speed Printing: The Ender-7 boasts a normal printing speed of up to 250mm/s, allowing you to enjoy rapid printing while maintaining precise quality.

  2. Build Volume: With a build volume of 220mm x 220mm x 300mm, it provides ample space for your creative projects.

  3. Filament Compatibility: The Ender-7 is versatile and can work with a wide range of filaments, from standard PLA to more specialized materials.

  4. Temperature Capabilities: It can reach a hot-end temperature of 260°C and a build plate temperature of 100°C, making it suitable for various filament types.

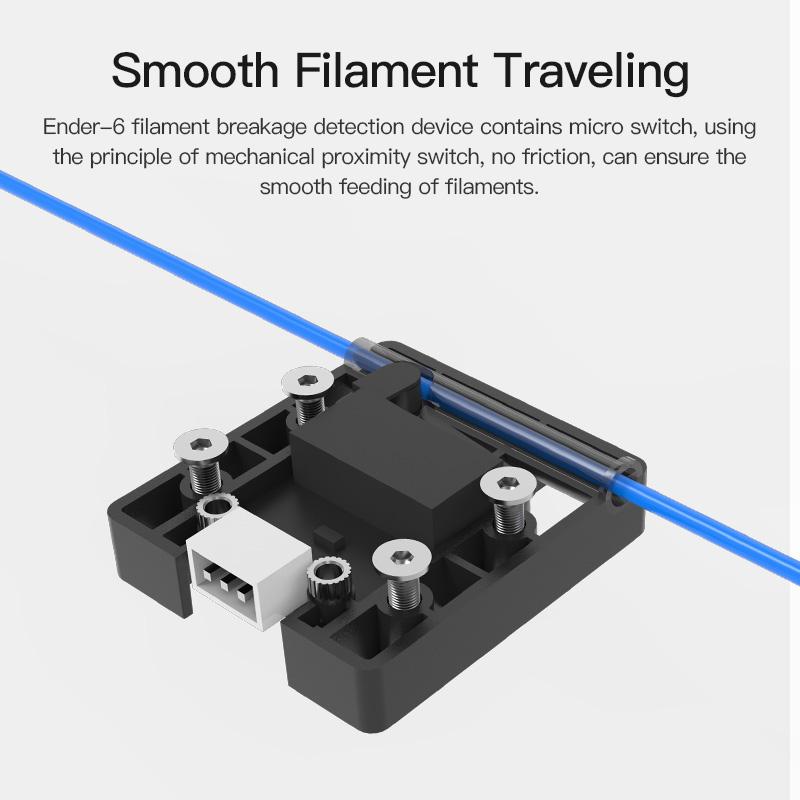
While the Ender-7 does not come with an integrated filament sensor, you can explore external options like the EZOut V3 Filament Sensor Kit or the Official Creality Filament Runout Sensor to enhance your printing experience. These sensors help prevent print failures due to filament depletion.

Benefits of Filament Runout Sensor in 3D Printing

Let’s delve into the benefits of using a filament runout sensor in 3D printing. These sensors play a crucial role in enhancing the printing process. Here’s why they matter:

  1. Avoiding Print Failures: Filament runout sensors detect when your printer runs out of filament. For smaller printers, this might not be critical, but for larger printers with substantial build areas, it’s essential. Imagine starting a lengthy print job only to realize halfway through that the filament spool is empty.

    The sensor prevents such mishaps by pausing the print and allowing you to replace the filament.

  2. Time and Material Savings: When a filament runout is detected, the printer stops, preventing wasted time and material. You won’t end up with incomplete or flawed prints due to filament depletion.

  3. Large Print Jobs: For those ambitious projects that require more than a single spool of filament, the sensor becomes invaluable. Large prints often consume more than the standard 1kg spool. With a filament runout sensor, you can confidently tackle multi-spool prints without worrying about interruptions.

  4. Smooth Continuation: Once you load a new spool and thread the filament through the extruder, the printer resumes from where it left off. No need to start over or manually adjust settings. It ensures a seamless continuation of your print job.

  5. Compatibility Across Price Ranges: You don’t need an expensive printer to benefit from a filament runout sensor. Even budget-friendly models, like the Creality Sermoon D1, come equipped with this feature.

A 3D printer is printing a blue vase.

IMG Source: filamatrix.com


Installing the Creality Ender 7 Filament Sensor

Let’s walk through the installation process for the Creality Ender 7 Filament Sensor. This handy sensor helps monitor your filament and prevents printing failures due to filament runout. Here are the steps to install it:

  1. Prepare Your Tools and Materials:

    • Make sure you have the necessary tools and components ready.
    • You’ll need the filament sensor itself, M4x8 or M4x10 socket cap screws, and M4 tee nuts.
  2. Locate the Filament Sensor Position:

    • The filament sensor should be installed near the extruder assembly.
    • It helps straighten the filament path as it enters the sensor, reducing drag and abrasions.
  3. Mounting Height:

    • Recommended mounting height for the filament sensor is approximately 75 mm below the runout sensor.
    • Adjust the position accordingly to ensure smooth filament feeding.
  4. Mounting the Filament Sensor:

    • Use two M4x8 or M4x10 socket cap screws to secure the filament sensor in place.
    • Attach the sensor to the frame or any suitable location near the extruder assembly.
    • Insert the M4 tee nuts into the corresponding slots on the frame.
  5. Print Settings:

    • For optimal performance, use the following print settings:
      • Nozzle Diameter: 0.4 mm
      • Layer Height: 0.2 mm
  6. Calibration and Testing:

    • After installation, perform a test print to ensure that the filament sensor detects filament movement correctly.
    • Make sure the sensor triggers when the filament runs out or gets tangled.

Remember to consult your Ender-7 User Manual for additional details and safety precautions

3D printed bearing filament guide for Bowden tube.

IMG Source: crosslink.io


Filament Sensor Maintenance Tips

Proper maintenance of your Creality Ender 7 filament sensor is essential to ensure smooth 3D printing. Here are some effective tips for maintaining your filament sensor:

  1. Filament Replacement:

    • When replacing filament mid-print, follow these steps:
      1. Cut the Filament: Trim the existing filament near the extruder.
      2. Feed New Filament: Slowly feed the new filament until it enters the PTFE tube.
      3. Preheat the Nozzle: Preheat the nozzle.
      4. Extrude and Feed: Press and hold the extruder, extract the old filament, then feed the new filament.
  2. Regular Cleaning and Lubrication:

    • Periodically maintain the sliding rails and sliding blocks in the X/Y line (usually every 3-6 months).
    • If you notice abnormal sounds during operation or lack of lubrication on the sliding rails, it’s time for maintenance.

The image shows a 3D printer filament sensor, which uses a micro switch to detect the presence of filament.

IMG Source: media-amazon.com


Impressive Features of Creality Ender-7 3D Printer

Let’s delve into how the Creality Ender-7 3D printer, with its impressive features, can enhance your 3D printing workflow.

  1. High-Speed Printing:

    • The Ender-7 boasts a normal printing speed of up to 250 mm/s, which significantly exceeds the typical printing speeds in the market.
    • This rapid printing capability allows you to save time and present your work more quickly.
  2. Core-XY Structure:

    • The Ender-7 utilizes a Core-XY structure, which involves dual motors running in parallel with coordinated operations.
    • This design ensures faster speed and higher precision during printing.
  3. Linear Rails for Stability:

    • To address belt tensioning and pulley placement challenges, Creality has incorporated linear rails into the Ender-7.
    • These bearing-block linear rails provide exceptional stiffness, making them ideal for demanding systems like CoreXY while allowing smooth motion across axes.
  4. Cooling Efficiency and Nozzle Design:

    • The Ender-7 features a unique butterfly-shaped wing ducted cooling fan that draws in 169% more air than previous models.
    • This efficient cooling system ensures print quality even at high speeds.
    • Additionally, the customized nozzle design allows for smooth filament feeding, even during rapid printing.
  5. Versatility in Filament Compatibility:

    • Capable of reaching a hot-end temperature of 260°C and a build plate temperature of 100°C, the Ender-7 can work with a wide range of filaments.
    • Whether you’re using standard PLA or specialized materials, this printer adapts to your needs.
  6. Specifications:

    • Build volume: 250 x 250 x 300 mm
    • Feeder system: Bowden drive
    • Nozzle size: 0.4 mm
    • Max. hot end temperature: 260°C
    • Max. heated bed temperature: 100°C
    • Print bed material: Coated glass
    • Frame: Aluminum
    • Bed leveling: Manual
    • Connectivity: SD card, USB cable
    • Print recovery: Yes
    • Filament sensor: Yes
  7. Price and Availability:

    • The retail price for the Ender-7 is $729.
    • You can find it on Pergear with a 5% discount or on Amazon with the same discount.

A schematic overview of the proposed method.

IMG Source: springernature.com


In conclusion, the Creality Ender-7 and its accompanying Filament Sensor stand as formidable tools in the arsenal of 3D printing enthusiasts. The Ender-7’s high-speed printing, Core-XY structure, linear rails for stability, efficient cooling system, and broad filament compatibility make it a top contender in the market. When coupled with the Creality Ender 7 Filament Sensor, which ensures uninterrupted printing by detecting filament runout, the Ender-7 becomes an even more reliable and efficient printing solution.

By following proper installation steps and maintenance tips, you can maximize the performance and longevity of your Ender-7 filament sensor. Embrace the future of 3D printing with the Creality Ender-7 and its essential filament sensor, and unlock a world of endless creative possibilities.

Comments

    Leave a Reply

    Your email address will not be published. Required fields are marked *