Ultimate Guide to Creality CR-10 Filament Sensor

Ultimate Guide to Creality CR-10 Filament Sensor

Are you looking to enhance your 3D printing experience with the Creality CR-10 Filament Sensor? This crucial component can make a significant difference in the success of your prints. From filament monitoring to pause functionality, the filament sensor ensures that your printer operates smoothly without wastage.

Let’s explore the key benefits and installation process to understand how the CR-10 filament sensor can elevate your 3D printing projects.

CR-10 Filament Sensor Benefits

The Creality CR-10 filament sensor is a crucial component of the 3D printer. Its primary function is to ensure that the printer always uses the correct amount of filament during printing. Here are some key points about the CR-10 filament sensor:

  1. Filament Monitoring: The sensor continuously monitors the filament as it feeds into the printer. If the filament runs out completely, the sensor can trigger an action, such as pausing the print job. This prevents the print from being ruined due to insufficient filament.

  2. Pause Functionality: When the filament sensor detects that the spool is empty or nearing the end, it can pause the print process. This gives you an opportunity to replace the filament spool before continuing the print job.

  3. Installation: Installing a filament runout sensor on your Creality CR-10 involves configuring the hardware and adjusting settings in the Marlin firmware. You’ll need to connect the sensor to the appropriate pins on the control board and configure the firmware to recognize the sensor.

  4. Benefits: The filament sensor provides peace of mind during long prints, especially when using large spools of filament. It helps prevent wasted time and material by avoiding incomplete prints due to filament depletion.

If you’re interested in adding a filament sensor to your CR-10, there are various resources available online, including tutorials and guides. You can find detailed instructions on how to install and configure the sensor to enhance your 3D printing experience.

Benefits of Filament Sensors in 3D Printers

Let’s delve into the benefits of filament sensors in 3D printers.

  1. Filament Runout Detection:

    • Filament sensors detect when the printer runs out of filament during a print job.
    • Especially crucial for large 3D prints, where a single spool of filament may not be sufficient.
    • When a filament runout is detected, the printer pauses the print, allowing you to replace the empty spool.
    • This prevents failed prints due to insufficient filament.
  2. Cost and Time Savings:

    • Filament sensors prevent wasted time and material.
    • Imagine a lengthy print job failing because the filament ran out halfway through. With a sensor, you can avoid such scenarios.
    • By minimizing print failures, you save both filament and time spent on failed prints.
  3. Ease of Use:

    • Filament sensors are relatively simple to install and set up.
    • They enhance the overall user experience by reducing the need for constant monitoring during long prints.
    • Once you load a new spool, the printer resumes printing from where it left off.
  4. Compatibility:

    • Filament sensors are available across a range of 3D printers, from budget-friendly models to high-end ones.
    • Even affordable printers like the Creality Sermoon D1 come equipped with filament runout sensors.

In summary, filament sensors are a practical feature that can save you time, money, and frustration, especially when working with large prints. Whether you’re a seasoned 3D printing enthusiast or a beginner, having a filament sensor can significantly improve your printing experience.

The image shows a 3D printed peristaltic pump with a clear tube attached to it.

IMG Source: circuitdigest.com


Installing Filament Runout Sensor on Creality CR-10 3D Printer

Let’s walk through the installation process for a Filament Runout Sensor on your Creality CR-10 3D printer. This sensor helps prevent print failures by detecting when your filament runs out during a print job. Here are the steps:

  1. Hardware Configuration:

    • First, gather the necessary components:
      • Filament runout sensor (compatible with Creality CR-10)
      • Wires (if not included with the sensor)
      • Screwdriver
    • Locate the extruder assembly on your CR-10.
    • Attach the filament runout sensor to the extruder assembly. Position it so that it can detect the filament passing through.
    • Connect the sensor’s wires to the appropriate pins on the control board. Refer to the sensor’s documentation for pinout details.
    • Secure the sensor in place using the provided screws.
  2. Marlin Configuration:

    • Access the Marlin firmware configuration files for your CR-10. You can do this through a USB connection to your computer.
    • Open the Configuration.h file.
    • Uncomment or add the following lines to enable the filament runout sensor:
      #define FILAMENT_RUNOUT_SENSOR
      #define FILAMENT_RUNOUT_SENSOR_INVERTING true // Adjust if needed
      
    • Save the changes and upload the modified firmware to your CR-10.
  3. Conclusion:

    • Reassemble the printer if you had to disassemble any parts.
    • Load filament into the printer as usual.
    • Test the filament runout sensor by starting a print and manually pausing it. Remove the filament to trigger the sensor.
    • If everything works correctly, your CR-10 is now equipped with a filament runout sensor!

For visual guidance, you can also refer to this YouTube video by Chris Riley, where he demonstrates the installation process

A red 3D printed part is attached to the Bowden tube of a 3D printer.

IMG Source: cults3d.com


Troubleshooting Tips for Filament Sensor Issues

If you’re experiencing issues with your filament sensor, here are some troubleshooting tips to help you get back on track:

  1. Check Firmware Compatibility:
    Ensure that you have the correct firmware version for your specific filament sensor. The new IR Filament Sensor requires the S/S+ version of the firmware. Having the incorrect firmware might cause calibration failures due to differences in extruder part designs.

  2. Verify Wiring Orientation:
    Confirm that the connector is properly oriented. It should be on the bottom row of pins, covering all pins, with the red wire on the right. Refer to the picture below for the correct orientation.

    !Wiring Orientation

  3. Check Extruder Assembly:
    Before disassembling anything, inspect key parts of your extruder assembly:

    • M3x40 screw: Ensure it’s secure but not overtightened.
    • M2x8 screw: Secure the IR sensor without overtightening.
    • Adapter-printer part: Make sure it’s not protruding above the surrounding extruder surface.
    • Use the LCD Menu -> Support -> Sensor info to adjust the ‘Fil. Sensor’ value.
  4. Access the Filament Sensor Mechanism:
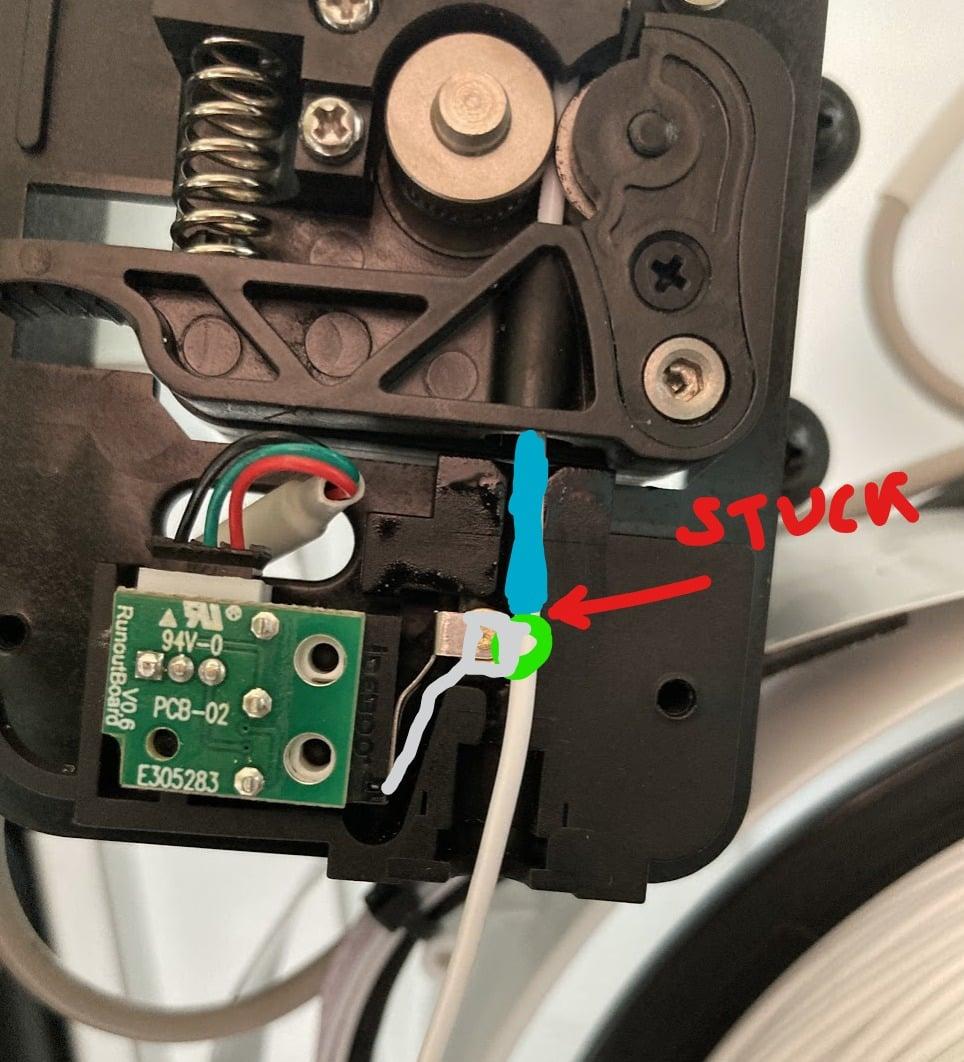
    • Toggle Filament autoload off in the LCD Menu -> Settings -> F. autoload (but keep ‘Fil. sensor’ ON).
    • Verify that the FS lever (the part moved by the filament to activate the sensor) functions as expected. Access it by following the steps above.

The white filament is stuck in the extruder.

IMG Source: redd.it


Tips for Maintaining Creality CR-10 Filament Sensor

Maintaining the Creality CR-10 Filament Sensor is essential to ensure smooth 3D printing. Here are some tips to keep it in good working condition:

  1. Calibration Check:

    • First, verify that the sensor is properly calibrated. If it’s not, it might inaccurately detect the amount of filament remaining on the spool.
    • Adjust the calibration settings if needed.
  2. Cleaning:

    • Occasionally, the sensor may accumulate dust or debris. Use compressed air or a small brush to clean it gently.
    • Ensure that the sensor’s optical components are free from any obstructions.
  3. Trigger Adjustment:

    • The filament sensor can sometimes fail to recognize filament passing through. One common issue is a slightly bent trigger switch.
    • Check if the trigger is snugly fit into the housing. If not, it may allow filament to pass down the side, causing the sensor to release the button.
    • Consider creating a back piece for the housing unit (you can find designs on Thingiverse) to prevent the trigger from moving around while maintaining wheel mobility.
  4. Filament Replacement:

    • When changing filament, follow these steps:
      • Trigger filament detection and click to change material.
      • Return to the print page and reheat the nozzle to the extrusion temperature.
      • Apply slight pressure to the extruder clamp and remove the old filament (waste material).
      • Feed the new filament through the filament break detection device.

3D printed part to fix the filament runout sensor on the Creality CR-10 V3.

IMG Source: ytimg.com


In conclusion, the Creality CR-10 Filament Sensor serves as a valuable addition to your 3D printing setup. By enabling filament runout detection, cost savings, ease of use, and compatibility with various 3D printers, this sensor offers practical advantages for both beginners and experienced enthusiasts. Ensuring proper installation and maintenance of the CR-10 filament sensor is crucial for seamless printing experiences.

By following the installation steps and troubleshooting tips, you can optimize the performance of your CR-10 and enjoy uninterrupted 3D printing. Embrace the efficiency and reliability that the Creality CR-10 Filament Sensor brings to your printing projects.

Comments

    Leave a Reply

    Your email address will not be published. Required fields are marked *