Welcome to a comprehensive exploration of the thermistor“>Bambu Lab P1S 3D printer and its nozzle thermistor. In this article, we will delve into the intricacies of the P1S nozzle thermistor, highlighting its features, common user experiences, and potential challenges faced by users. Whether you’re a seasoned 3D printing enthusiast or a newcomer to the field, understanding the nuances of the Bambu Lab P1S Nozzle Thermistor is essential for maximizing the performance of your printer.
Bambu Lab P1S 3D Printer Features Ceramic Heater and Thermistor Module
The Bambu Lab P1S 3D printer features a combined ceramic heater and thermistor module. Let’s delve into the details:
Ceramic Heater:
The ceramic heater integrated into the P1S can heat the nozzle up to an impressive 300°C.
This high-temperature capability allows for versatile printing, especially when working with materials that require elevated extrusion temperatures.
Thermistor:
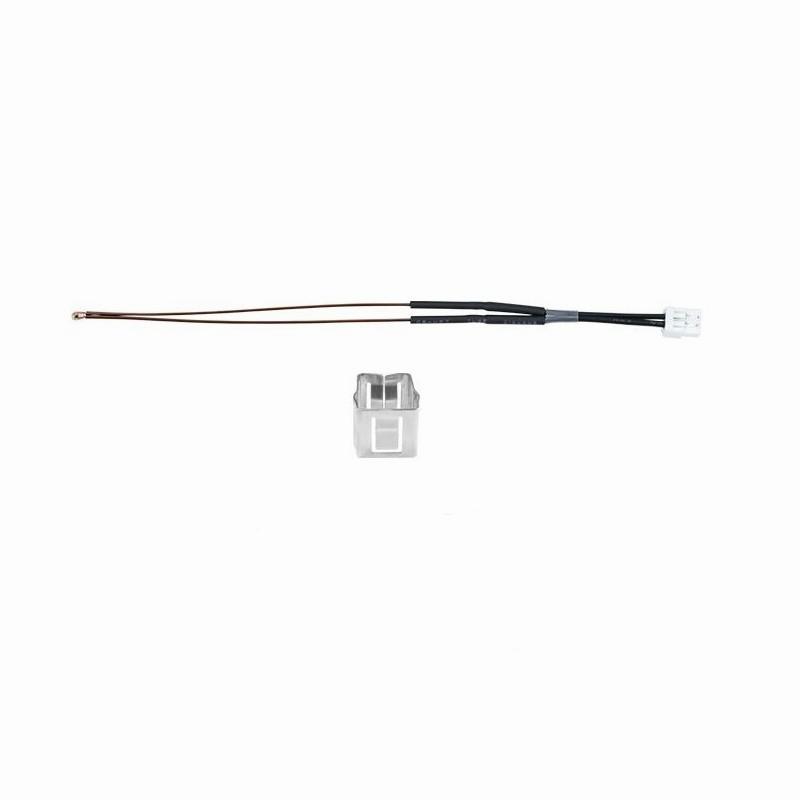
The thermistor, which is part of the same module, provides highly accurate temperature measurement.
Its reliable structural design ensures consistent performance even under extreme conditions.
Unlike some other components, thermistors do not have a specific orientation or polarity. As long as the connector is fully seated, it doesn’t matter which way it’s facing.
However, it seems that some users have encountered issues related to the nozzle temperature and thermistor. Here are some experiences shared by fellow Bambu Lab users:
Nozzle Temperature Malfunction:
Some users faced nozzle temperature malfunctions after disassembling and reassembling their toolheads.
In some cases, the thermistor wire was suspected to be damaged, leading to the issue.
Replacement parts (including full assemblies) didn’t always resolve the problem immediately.
False Plugins and Connector Challenges:
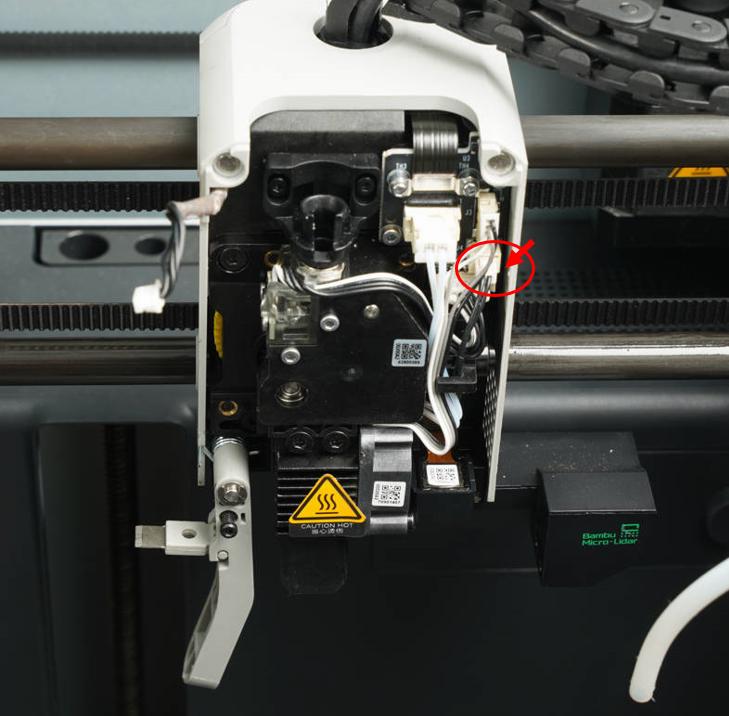
The connectors on the P1P toolhead can sometimes lead to false connections.
Ensuring proper seating of cables and connectors is crucial.
Users have reported frustration with the delicate cables and connectors during replacement or troubleshooting.
Design Flaws and Support Delays:
There have been concerns about design flaws, especially when a shorted thermistor can impact the toolhead board.
Waiting for replacement parts, shipping delays, and downtime have been common frustrations for users.
If you’re experiencing nozzle temperature issues, I recommend reaching out to Bambu Lab support for assistance. They might provide specific troubleshooting steps or guide you through the process of resolving the problem. Remember, you’re not alone—other users have faced similar challenges, and community support can be valuable during these situations.
Bambu Lab P1S 3D Printer Technical Specifications
Here are the technical specifications for the Bambu Lab P1S 3D printer:
Chamber Monitoring Camera: Low Rate Camera 1280×720/0.5fps (Timelapse Supported)
Filament Run Out Sensor: Yes
Filament Odometry: Optional with AMS
Power Loss Recovery: Yes
Physical Dimensions:
Dimensions (WxDxH): 389x389x458 mm³
Net Weight: 12.95 kg
Electrical Parameters:
Input Voltage: 100-240 VAC, 50/60 Hz
Max Power: 1000 W @ 220 V, 350 W @ 110 V
USB Output Power: 5V/1.5A
Electronics:
Display: 2.7-inch 192×64 Screen
For more details, you can refer to the official Bambu Lab website
IMG Source: imprimante-3d-service.com
Bambu Lab P1S Nozzle Thermistor Installation and Calibration
To install and calibrate the Bambu Lab P1S Nozzle Thermistor, follow these steps:
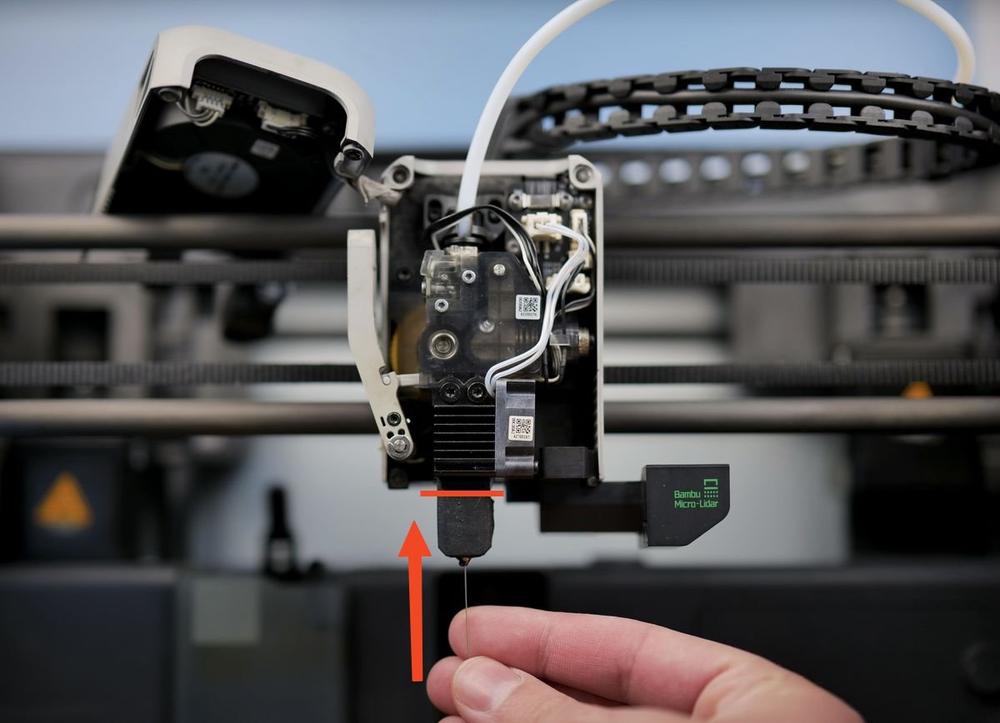
Nozzle Installation:
Remove the existing nozzle: If you need to replace the nozzle, start by removing the original 0.4mm nozzle from your BambuLab P1S 3D printer. You can find detailed instructions in this video by ENGINEER3D PRINTS.
Replace with a new nozzle: Install the desired nozzle (e.g., a 0.6mm hardened nozzle) using the complete hotend assembly. This will allow you to print at different layer heights and improve print quality.
Calibration:
Initial Calibration:
Follow the quick start manual provided by Bambu Lab to set up your P1S printer. It includes instructions for initial calibration and binding your printer to your Bambu Lab account.
Scan the QR code on the screen using Bambu Handy (an app) to bind your printer.
Complete the initial calibration process as guided by the instructions on the screen.
Print Quality Calibration:
After installing the new nozzle, it’s essential to verify print quality.
Print a test model (such as an 18-minute Benchy) at your desired layer height (e.g., 0.36mm).
Inspect the print quality to ensure it meets your expectations.
IMG Source: bambulab.com
Bambu Lab P1S Nozzle Thermistor Maintenance Tips
Here are some maintenance tips for the Bambu Lab P1S nozzle thermistor:
Regular Cleaning: Ensure that you periodically clean the nozzle and thermistor. Filament residue can accumulate over time, affecting temperature readings. Use a soft brush or compressed air to remove any debris.
Check Wiring Connections: Inspect the wiring connections between the thermistor and the control board. Loose or damaged wires can lead to inaccurate temperature readings. Make sure they are securely connected.
Calibration: Occasionally calibrate the thermistor to ensure accurate temperature measurements. Follow the manufacturer’s guidelines for calibration procedures.
Sensor Placement: Verify that the thermistor sensor is correctly positioned within the nozzle. Incorrect placement can result in inaccurate readings. Refer to the printer’s manual for the correct positioning.
Inspect for Damage: Regularly check the thermistor for physical damage. If you notice any cracks or signs of wear, replace it promptly.
Monitor Error Messages: If you encounter error messages related to abnormal nozzle temperature, troubleshoot by checking the thermistor. It might be faulty or disconnected.
Remember that proper maintenance ensures consistent and reliable performance from your Bambu Lab P1S printer. If you encounter persistent issues, consider seeking advice from the manufacturer or community forums.
IMG Source: bambulab.com
Common Bambu Lab P1S Nozzle Issues
Let’s troubleshoot the Bambu Lab P1S nozzle thermistor issue. Here are some common scenarios and solutions:
Nozzle Not Heating Up:
If your nozzle isn’t heating up, follow these steps:
Check the Nozzle Wiring: Ensure that the nozzle’s heating element (thermistor) is properly connected. Inspect the wiring for any damage or loose connections.
Verify Thermistor Functionality: Test the thermistor by measuring its resistance using a multimeter. It should show a consistent value within the expected range.
Inspect the Heater Cartridge: Make sure the heater cartridge (the component responsible for heating the nozzle) is functioning correctly. If it’s faulty, replace it.
Abnormal Nozzle Fan Speed:
If you’re experiencing abnormal fan speed, consider the following:
Check Fan Wiring: Verify that the fan wires are correctly connected and seated. A bad fan wiring or sensor could cause irregular fan behavior.
Remember to follow safety precautions while troubleshooting, especially when dealing with electrical components. If the issue persists, consider reaching out to Bambu Lab’s community forum or seeking professional assistance.
IMG Source: bambulab.com
In conclusion, the Bambu Lab P1S Nozzle Thermistor plays a crucial role in the functionality of the 3D printer, enabling precise temperature control and ensuring optimal printing outcomes. While users have encountered some challenges related to nozzle temperature issues and thermistor malfunctions, proactive maintenance and troubleshooting can help overcome these hurdles. By following the provided installation, calibration, and maintenance tips, you can enhance the longevity and performance of your Bambu Lab P1S printer.
Remember, a well-maintained nozzle thermistor is key to consistent and reliable 3D printing results.