Are you ready to take your Raise3D Pro2 series 3D printer to the next level by replacing the hotend? Dive into this detailed guide that will walk you through the process step by step. From lowering the build plate to wiring the new hotend, we’ve got you covered with all the essential instructions you need for a successful hotend replacement.
Easy Hotend Replacement Process for Raise3D Pro2 Series 3D Printer
Replacing the hotend on your Raise3D Pro2 series 3D printer is a straightforward process. Here are the step-by-step instructions:
Lower the Build Plate:
Access the “Utilities” tab on your 3D printer.
Use the onboard touchscreen to lower the Z-Axis platform until you have enough clearance (about 5-12 mm) to comfortably work with the tools.
Unload Filaments:
In the “Utilities” tab, verify that the temperature is set for your selected material (e.g., 215°C for Raise3D PLA).
Once the temperature is reached, the “Unload” button will become available. Press it to withdraw the filament.
Cooldown Process:
Open the “Home” tab on the screen.
Set the nozzle temperature to 0 and press OK. Repeat this process for both nozzles.
Allow the components to cool down completely before proceeding.
Removing the Hotend:
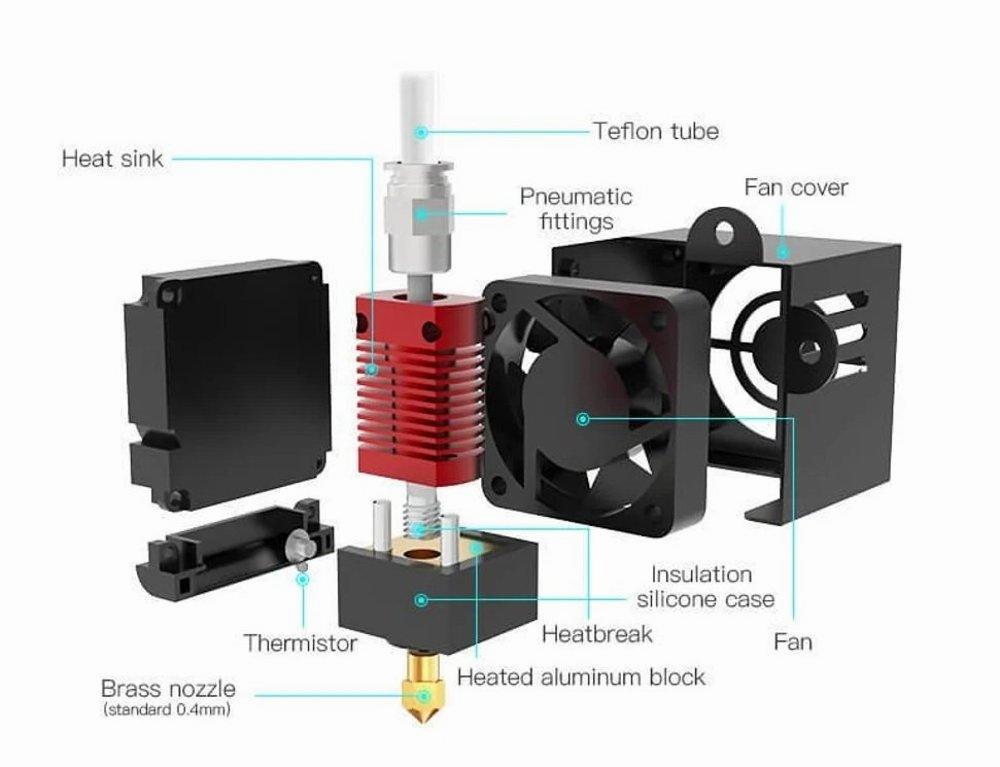
Use a 2.5mm hex wrench to remove the two screws securing the cooling fan.
Loosen the four set screws inside the heating block using a 1.5mm hex wrench. This will release the hotend from the wiring.
Loosen the fixing screw to fully remove the hotend from the 3D printer.
Inspect Replacement HotEnd:
Verify that the new hotend is properly adjusted. The bottom of the heat sink should lie flush with the bottom of the larger cylinder.
If the heat sink is improperly positioned, refer to the “How to Change a Nozzle” document for additional instructions.
Wiring Process:
Insert the heater rod (Red Wire) into the bottom hole of the heater block. Secure it with the two set screws.
Insert the silver thermocouple into the upper hole on the heater block and secure it in place with the two set screws.
Installing the Hotend:
Follow the manufacturer’s instructions to install the new hotend.
Remember to handle the hotend components carefully and follow safety precautions. If you have any questions, feel free to reach out to the manufacturer’s support team
When to Replace Your 3D Printer Hotend
Replacing a 3D printer hotend is essential for maintaining print quality and preventing issues. Let’s dive into the details:
Natural Wear and Tear:
Your hotend experiences wear and tear over time due to constant use, especially at higher temperatures.
Signs of natural wear include:
Clicking: If you hear clicking sounds during printing, it could indicate a worn-out hotend.
Leaking: A leaking hotend is problematic. Material should not escape from it, as it can damage the printer and ruin ongoing prints.
Oozing: Oozing material is another clear sign that your hotend needs replacement. It should not leak material.
Temperature Fluctuations: If your hotend displays unusually high or low temperatures, it’s time to consider replacement.
Quality and Material Matters:
High-quality hotends can last many years if used correctly.
Follow the manufacturer’s recommendations for filament types and temperatures.
Poor-quality parts may melt and deform faster due to the hotend’s high temperature.
Consider using an all-metal hotend from a reputable manufacturer for longevity.
Different hotends have varying capabilities (e.g., handling higher temperatures), so choose wisely.
How Long Do Hotends Last?:
With proper care, hotends can last several years.
Abuse (using incorrect filaments or exceeding recommended temperatures) accelerates degradation.
An abused hotend breaks down more rapidly.
Regular maintenance and adherence to guidelines are crucial.
Frequency of Replacement:
Expect to replace the hotend after a few years of use.
Keep an eye on the signs mentioned above to determine when it’s time for replacement.
IMG Source: 3dprinteraccessories.shop
Factors to Consider When Choosing a 3D Printer Hotend
When selecting a 3D printer hotend, there are several factors to consider:
Material Compatibility: The type of material you plan to print will significantly influence the choice of hotend. Different materials have varying melting temperatures, so ensure that the hotend can handle the specific filament you intend to use.
Printer Compatibility: If you’re upgrading from the stock hotend, make sure the new one is compatible with your existing printer. Not all hotends fit every printer model, so check for compatibility before making a decision.
Nozzle Type: Nozzles come in different materials, including brass, hardened steel, and ruby-tipped steel. Each material has its advantages and disadvantages. For example, brass nozzles are common and affordable, but they wear out faster when printing abrasive materials.
Hardened steel nozzles are more durable and suitable for abrasive filaments, while ruby-tipped steel nozzles offer excellent wear resistance.
Nozzle Diameter: The nozzle diameter affects print speed, detail level, and layer height. Smaller nozzles produce finer details but may take longer to print, while larger nozzles allow faster printing but with less intricate details. Consider your specific project requirements when choosing the nozzle diameter.
Thermal Conductivity and Heat Retention: High-quality hotends efficiently transfer heat to the filament, ensuring consistent temperature control. Look for hotends that maintain stable temperatures during printing to avoid clogs and improve print quality.
Price and Availability: Hotends vary in price, and availability may differ based on the manufacturer and model. Consider your budget and whether replacement parts are readily accessible.
IMG Source: squarespace.com
Step-by-Step Hotend Replacement Guide for Raise3D Pro2 Series
Here’s a step-by-step guide for replacing the hotend on your Raise3D Pro2 series 3D printer:
Lower the Build Plate:
Turn on your 3D printer and access the “Utilities” tab.
Use the onboard touchscreen to lower the Z-Axis platform. Aim for a clearance of 5-12 mm.
This step ensures you have enough space to work comfortably.
Unload Filaments:
In the “Utilities” tab, verify that the temperature is set for your selected material (e.g., 215°C for Raise3D PLA).
Adjust the temperature if needed.
Press the “Unload” button to begin filament unloading.
Once the temperature is reached, the “Unload” button becomes available. Use it to withdraw the filament.
Cooldown Process:
Open the “Home” tab on the screen.
Click on the nozzle temperature option.
Set the temperature to 0 and press OK.
Repeat this process for both nozzles.
Allow the components to cool down completely before proceeding.
Removing the Hex Screws:
Use a 2.5mm hex wrench to remove the two screws securing the cooling fan.
Inside the heating block, loosen the 4 set screws using a 1.5mm hex wrench. This will release the hotend from the wiring.
Loosen the fixing screw to fully remove the hotend from the 3D printer.
Inspect Replacement HotEnd:
Verify that the new hotend is properly adjusted.
The bottom of the heat sink should lie flush with the bottom of the larger cylinder.
If the heat sink is improperly positioned, refer to the “How to Change a Nozzle” document for additional instructions.
Wiring Process:
Insert the heater rod (Red Wire) into the bottom hole of the heater block. Secure it with the two set screws.
Insert the silver thermocouple into the upper hole on the heater block and secure it in place.
Installing The Hotend:
Follow the manufacturer’s instructions to install the new hotend, ensuring proper alignment and secure attachment.
For detailed visuals and additional information, you can refer to the official Raise3D guide.
IMG Source: wp.com
Step-by-Step Guide for Installing a New Hotend
Installing a new hotend on your 3D printer can be both exciting and challenging. Here’s a step-by-step guide to help you through the process:
Preparation and Safety Measures:
Unload Filament: Begin by unloading the filament from the extruder. Turn off the printer and unplug it.
Protect the Heatbed: Remove the flexible steel sheet and cover the heatbed with a cloth or fabric to prevent scratching during disassembly.
Disconnecting the Hotend Cables:
Open the Einsy case and cut the zip ties on the cable bundle (be careful not to cut the cables!).
Release the screws on the cable clip and disconnect the extruder heater and thermistor from the Einsy board.
Removing the Hotend:
Remove the textile sleeve from the cable bundle, starting from the Einsy-base and going to the extruder.
Cut the zip ties on the bottom side of the cable-holder.
Partially disassemble the extruder by removing screws from the hotend fan and creating a gap.
Pull out the hotend from the extruder and remove it from the printer.
New Hotend Installation:
Prepare the new hotend and gather zip ties.
Insert the new hotend into the extruder assembly and secure it.
Attach the thermistor and heater cartridge to the hotend.
Insert the new nozzle into the hotend and tighten it.
In conclusion, maintaining your Raise3D Pro2 printer with a hotend replacement is crucial for ensuring optimal print quality and the longevity of your device. By following the outlined steps and understanding the signs that indicate the need for a new hotend, you can keep your 3D printer operating smoothly for years to come. Remember to choose a quality hotend that suits your printing needs and handle the replacement process with care.
With this comprehensive guide on ‘Raise3D Pro2 Hotend Replacement,’ you are now equipped to enhance your 3D printing experience and create amazing projects with confidence.