Enhance Your 3D Printing with Creality K1 Max Cooling Fans
When it comes to maximizing the efficiency and quality of your 3D printing experience, understanding the intricacies of cooling fans is crucial. In this article, we delve into the world of Creality K1 Max cooling fans, exploring their functions, benefits, and potential modifications to elevate your printing results. Whether you’re a seasoned enthusiast or new to the 3D printing realm, harnessing the power of cooling fans can significantly enhance your printing endeavors with the Creality K1 Max.
Creality K1 Max 3D Printer Cooling Fans
The Creality K1 Max 3D printer comes equipped with cooling fans to regulate temperature during printing. Let’s delve into some details about these fans:
Side Cooling Fan:
The K1 Max features a side cooling fan. However, it seems to be causing issues with Silk filament prints, specifically leading to support structures failing on the fan side only.
If you’re using regular PLA, the side fan shouldn’t pose any problems.
To address this:
You could remove the side fan completely and adjust the temperature settings accordingly for regular PLA.
Alternatively, consider adding a second fan on the other side to balance cooling. Keep in mind that this would increase the overall noise level.
And hey, while we’re at it, the microwave turning bed idea might be a bit far-fetched, but it would indeed be a cool mod
Mainboard Cooling Fan:
The K1 Max’s mainboard cooling fan is plugged into the 3-pin controllable fan port.
If you find the fan noise bothersome, you can try reducing its speed. Some users have successfully turned down the fan speed while maintaining good cooling performance for PLA prints.
Key Features of Creality K1 Max 3D Printer
The Creality K1 Max is an impressive Core XY 3D printer with several notable features. Let’s delve into its benefits, including the improved cooling:
Core XY Design: The K1 Max utilizes a Core XY configuration, which contributes to its impressive speed and accuracy. This design allows for faster movement of the print head, resulting in smoother prints.
Large Build Volume: With a 300 x 300 x 300mm build area, the K1 Max provides ample space for creating sizable 3D models. Whether you’re printing large prototypes or intricate designs, this printer has you covered.
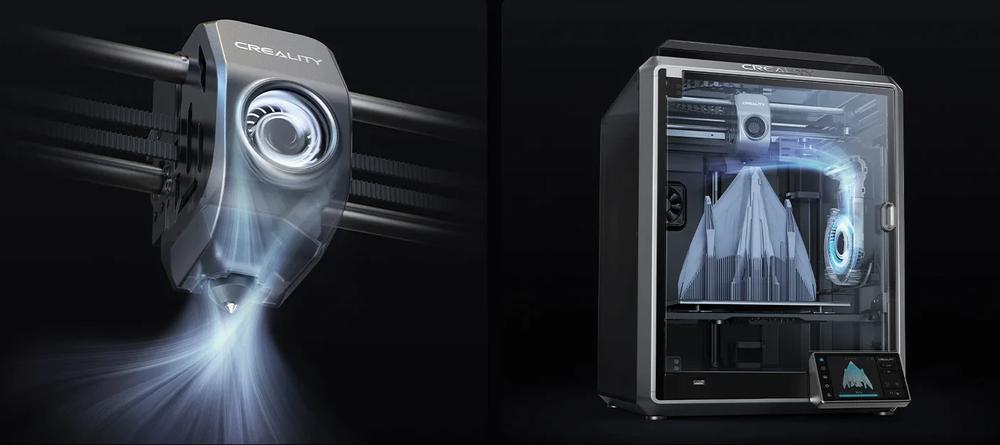
AI Sensors: The K1 Max is equipped with LIDAR and an AI camera. These sensors work together to detect potential print failures. If something goes wrong during a print, you’ll receive a warning, allowing you to address the issue promptly.
Improved Hotend: The K1 Max ships with an upgraded hotend covered by a ceramic heater. It heats up to 200°C in just 40 seconds, ensuring efficient filament melting and smooth extrusion. This enhancement is particularly beneficial for handling the printer’s fast print speeds.
Enclosed Design: The printer is enclosed, which helps maintain a stable printing environment. Enclosures provide better temperature control, reduce warping, and enhance overall print quality.
Smooth and Clean Prints: In tests, the K1 Max produced fast, smooth, and clean prints. It handles high-temperature filaments effortlessly, making it one of the best 3D printers available.
Despite a few drawbacks (such as a terrible filament path and clumsy use of Klipper firmware), the K1 Max offers an excellent balance of innovation, speed, and quality. If you’re looking for a reliable 3D printer with a substantial build volume, the K1 Max is a solid choice.
IMG Source: redd.it
Cooling Fan Considerations for Creality K1 Max
The Creality K1 Max is an impressive 3D printer, and it’s great to hear that you’re enjoying it! Let’s dive into the cooling fan situation:
Side Cooling Fan:
The side cooling fan on the K1 Max serves an essential purpose: it helps cool down the printed layers during the printing process. Proper cooling prevents warping, improves layer adhesion, and enhances overall print quality.
If you’re printing with regular PLA, the single side fan should suffice. However, when using Silk PLA, you’ve noticed that supports fail on the fan side only. This issue likely results from uneven cooling.
Here are some considerations:
Fan Functionality: The fan does indeed serve a purpose, especially for fast printing. It helps maintain optimal layer bonding and prevents overheating.
Balancing Cooling and Warping: With the K1 Max’s larger build volume, consider adding a second side cooling fan. This can help balance cooling across the entire print area. However, be mindful of potential warping due to excessive cooling.
Noise: If the fan noise bothers you, you can experiment by turning it off for a test print. However, keep in mind that this may negatively impact print quality.
Temperature Adjustment: Adjusting the bed temperature can also affect cooling. Try increasing the bed temperature from the default 45°C to 60°C.
Testing: Feel free to test with and without the fan to find the right balance for your specific filament type and print speed.
Cooling Fan Installation for Creality K1 Max 3D Printer
Let’s walk through the cooling fan installation for your Creality K1 Max 3D printer. Proper cooling is essential for achieving high-quality prints. Here are the steps to install a cooling fan:
Unboxing and Preparation:
Begin by unboxing your Creality K1 Max and ensuring you have all the necessary components.
Familiarize yourself with the printer’s layout and locate the areas where the cooling fan needs to be installed.
Identify the Cooling Fan Location:
The cooling fan is typically positioned near the hotend assembly (extruder).
Look for a fan mount or duct where the cooling fan will attach.
Choose the Right Cooling Fan:
Select a suitable cooling fan. You can use the stock fan that came with the printer or consider upgrading to a quieter or more efficient fan.
Make sure the fan dimensions match the existing mount.
Remove the Existing Fan (if applicable):
If your printer already has a cooling fan, carefully remove it.
Disconnect any wires connected to the old fan.
Install the New Cooling Fan:
Attach the new cooling fan to the designated mount.
Secure it using screws or clips provided with the fan.
Connect the fan wires to the appropriate connectors on the control board.
Routing the Wires:
Route the fan wires neatly along the printer frame to avoid interference with moving parts.
Use cable ties or clips to secure the wires in place.
Test the Fan:
Power on the printer and check if the cooling fan spins.
Ensure it’s blowing air towards the hotend to cool the printed layers effectively.
Enhancing Cooling Efficiency for Creality K1 Max 3D Printer
The Creality K1 Max is an impressive Core XY 3D printer with a large build volume of 300 x 300 x 300 mm. To enhance its cooling efficiency, consider the following steps:
Fan Optimization:
The side cooling fan plays a crucial role in maintaining proper cooling during printing. While it’s essential for fast PLA printing, it might cause issues with certain filaments like Silk. Here are some options:
Balance: Consider adding a second cooling fan on the opposite side to balance the airflow. However, this will increase noise.
Temperature Adjustment: For regular PLA, you can try adjusting the temperature and removing the fan. Experiment with different settings to find the right balance.
Vanilla Klipper: If you prefer using vanilla Klipper firmware, install it yourself to have more control over fan settings.
Note that excessive cooling can lead to warping, so find the right balance for your specific filament.
Hotend Cooling:
By default, the hotend fan runs at 100% after a print. You can modify this behavior to reduce the hotend fan speed to 80% and enable the side fan at 40%. This allows faster and quieter cooling without compromising print quality.
Filament Path Optimization:
The K1 Max has a terrible filament path, which can affect print quality. Ensure that the filament flows smoothly from the spool to the extruder. Consider using filament guides or other modifications to improve the path.
Temperature Settings:
Adjust the bed temperature based on your filament type. For faster printing, increase the bed temperature from the default 45°C to around 60°C.
In conclusion, the Creality K1 Max cooling fans play a vital role in the overall performance of this remarkable 3D printer. From the side cooling fan’s impact on filament types to the mainboard cooling fan’s noise management, understanding and optimizing these components can unlock a realm of printing possibilities. By carefully balancing cooling efficiency, filament compatibility, and fan settings, users can harness the full potential of the K1 Max.
Whether it’s exploring fan modifications, adjusting temperatures, or diving into filament path enhancements, meticulous attention to cooling fan details can elevate your prints to new heights of precision and quality. Embrace the power of Creality K1 Max cooling fans to unleash your creativity with confidence and precision.