Essential Guide to Creality Ender-3 V3 SE Nozzle Thermistor
Welcome to the world of 3D printing with the Creality Ender-3 V3 SE Nozzle Thermistor. Dive deep into understanding this crucial component that ensures the success of your printing endeavors. Unravel the mysteries surrounding the nozzle thermistor and discover how its proper functioning is imperative for maintaining the ideal temperature during the 3D printing process.
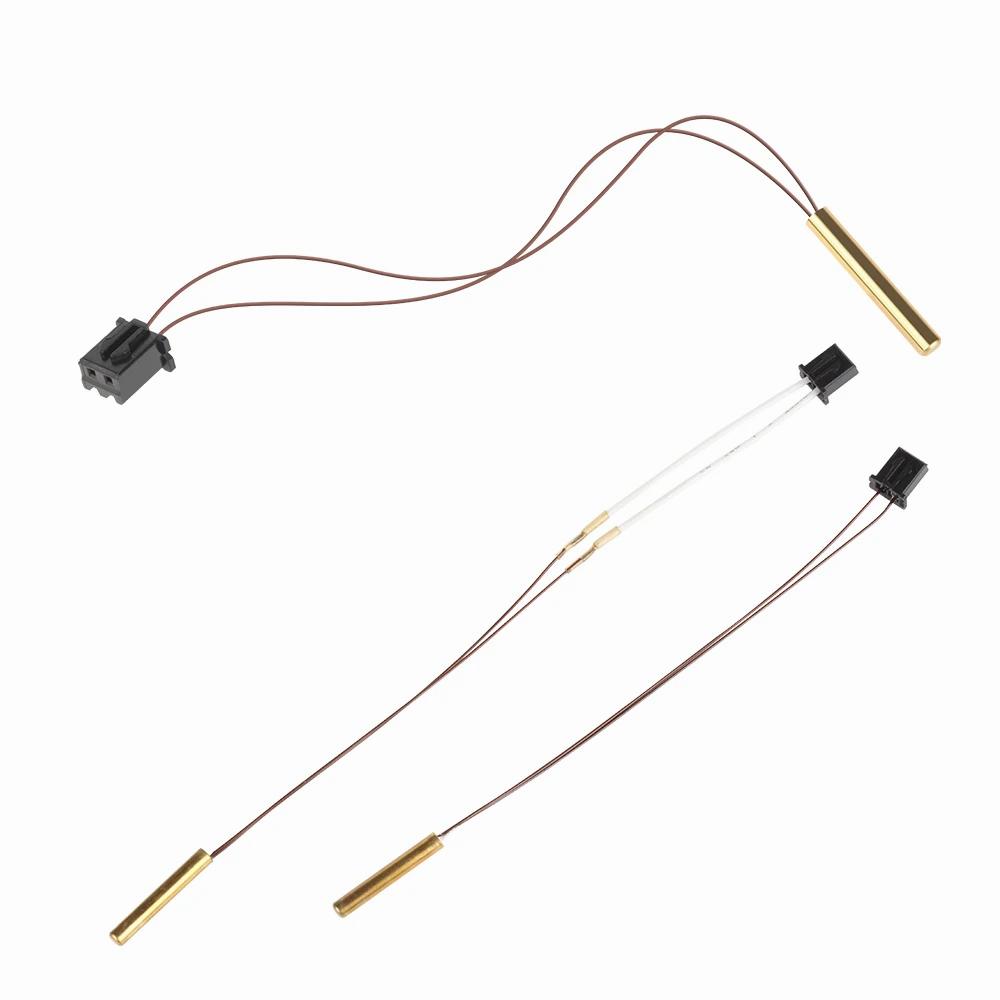
Understanding the Nozzle Thermistor
The Creality Ender-3 V3 SE is a popular 3D printer, and understanding its components is essential for troubleshooting. Let’s focus on the nozzle thermistor, which plays a crucial role in maintaining the correct temperature for successful 3D printing.
What is the Nozzle Thermistor?
The nozzle thermistor is a temperature sensor located near the hot end (nozzle) of the 3D printer. It measures the temperature of the hot end and provides feedback to the printer’s control board.
Creality’s Ender-3 V3 SE uses a 100K thermistor for this purpose.
Common Issues with the Nozzle Thermistor:
“Nozzle temperature is too low” error: If you encounter this error during printing, it indicates that the nozzle temperature is not reaching the desired level.
Possible causes:
Improperly seated thermistor: Ensure that the thermistor is correctly positioned within the heater block.
Cooling air interference: The thermistor may be gradually cooled by the part cooling fan. Check if the silicone sock is missing or misplaced, as it insulates the heater block from cooling air.
Faulty thermistor: If the thermistor is damaged, it won’t provide accurate temperature readings.
Solutions:
Recheck the thermistor’s placement and ensure it is securely seated.
Verify that the silicone sock is in place and properly insulating the heater block.
If the issue persists, consider replacing the thermistor with a direct replacement designed for the Ender-3 V3 SE.
Remember, maintaining the correct nozzle temperature is crucial for successful 3D printing. If you continue to face issues, consult the comprehensive Ender-3 V3 SE Troubleshooting Guide for further solutions
What Does a Thermistor Do in a 3D Printer?
Let’s delve into the fascinating world of thermistors in the context of 3D printing.
What Does a Thermistor Do in a 3D Printer?
A thermistor is a crucial component in Fused Deposition Modeling (FDM) 3D printers. But what exactly does it do? Let’s break it down:
Definition of Thermistor:
A thermistor (short for “Thermal Resistor”) is an electrical device whose resistance varies with temperature.
There are two main types of thermistors:
Negative Temperature Coefficient (NTC) Thermistors: Their resistance decreases as the temperature rises.
Positive Temperature Coefficient (PTC) Thermistors: Their resistance increases with higher temperatures.
Role in 3D Printers:
Thermistors serve as temperature sensing devices within 3D printers.
They are strategically placed in temperature-sensitive areas, such as:
Hot End: The part of the printer where the filament melts and extrudes.
Heated Bed: The surface where the printed object adheres during printing.
In these areas, thermistors continuously monitor the temperature.
They then relay this data back to the micro-controller (the brain of the printer).
Temperature Control:
Beyond sensing, thermistors also play a control role.
The 3D printer’s micro-controller uses the feedback from the thermistor to:
Regulate the print temperature.
Maintain it within the desired range for optimal printing conditions.
Commonly Used Type:
NTC thermistors are the most commonly used type in 3D printers.
Replacing and Attaching Thermistors:
Caution: Thermistors are fragile and can break easily.
Replacement:
If a thermistor malfunctions, it’s essential to replace it promptly.
They are often located in hard-to-reach areas within the printer.
Hot End Thermistor Replacement:
The hot end thermistor monitors the nozzle temperature.
Replacing it involves careful removal and installation.
Print Bed Thermistor Replacement:
The print bed thermistor monitors the heated bed temperature.
Similar care is needed when replacing it.
For those curious about specific thermistor models, here are a couple of recommendations:
Troubleshooting Thermistor Issues with Creality Ender-3 V3 SE 3D Printer
Let’s troubleshoot the thermistor issues with your Creality Ender-3 V3 SE 3D printer. Here are some common problems related to thermistors and their potential solutions:
Incorrect Temperature Readings:
If your printer is displaying inaccurate temperature readings, check the following:
Ensure the thermistor is properly connected to the control board.
Inspect the wiring for any damage or loose connections.
Calibrate the temperature settings in your slicer software.
Thermistor Error Messages:
If you receive error messages related to the thermistor, follow these steps:
Verify that the thermistor is securely attached to the hotend.
Check for any visible damage to the thermistor wires.
Replace the thermistor if necessary.
Heating Issues:
If the hotend isn’t heating up properly, consider the following:
Confirm that the thermistor is correctly positioned near the hotend nozzle.
Inspect the thermistor wires for any breaks or fraying.
Test the hotend’s resistance using a multimeter to ensure it’s within the expected range.
Remember to consult your Ender-3 V3 SE user manual
For more detailed information, you can refer to Creality’s comprehensive troubleshooting guide.
IMG Source: redd.it
Thermistor Calibration: A Detailed Guide
Thermistors are commonly used for temperature measurements due to their predictable but non-linear change in resistance with temperature. To achieve high accuracy, thermistor calibration is essential. Let’s delve into the details:
Steinhart-Hart Equation:
The Steinhart-Hart equation is a powerful tool for converting a thermistor’s resistance to temperature. It provides precise readings across a wide temperature range.
The equation is defined as follows:
[ T = \\frac{1}{{A + B \\cdot \\ln® + C \\cdot (\\ln®)^3}} ]
(T) represents the temperature (in kelvins).
(R) denotes the resistance at temperature (T) (in ohms).
(A), (B), and (C) are the Steinhart-Hart coefficients specific to your thermistor model and its temperature range.
These coefficients differ based on the thermistor type and its operating conditions.
Deriving Steinhart-Hart Coefficients:
If your thermistor manufacturer doesn’t provide the coefficients, or if you’re performing self-validation, follow these steps:
Obtain three accurate resistance values at known temperatures (either from a table or measured data).
Insert these values into the Steinhart-Hart equation to derive the coefficients (A), (B), and (C).
These coefficients will allow you to convert resistance readings to precise temperatures.
Online Calculators:
To expedite the process, several online Steinhart-Hart calculators are available. You can input temperature and resistance values to generate the coefficients.
Optimizing Thermistor Temperature on Ender-3 V3 SE
Optimizing the thermistor temperature on your Ender-3 V3 SE can significantly improve your 3D printing experience. Here are some steps you can take to achieve better temperature stability:
Re-secure Thermistor and Check the Wiring:
The thermistor is a crucial component for measuring temperature in 3D printers. Ensure that it is properly seated and secured.
If the thermistor’s glass bulb isn’t correctly positioned, it can lead to temperature fluctuations. Tighten the screw holding the thermistor in place to prevent this issue.
Loose connections in the thermistor wires can also cause fluctuations, so check those as well.
Consider adding a Silicone Sock around the nozzle to enhance temperature stability.
Replace the Thermistor:
A malfunctioning thermistor is a common cause of temperature fluctuations. If yours is no longer working, consider replacing it.
Some users have reported fixing temperature issues by replacing their thermistors within just ten minutes.
PID Autotune:
Use the PID autotune feature in your printer’s firmware. It helps fine-tune the temperature control parameters for more stable readings.
Install a Smooth Capacitor:
Adding a smooth capacitor can help reduce electrical noise and stabilize temperature readings.
Additionally, if you’re aiming for higher temperatures, consider the following:
Upgrade the Thermistor:
The default thermistor may not handle extreme temperatures. Consider using a reliable alternative like the POLISI3D T-D500 Thermistor.
Avoid using the stock PTFE tube beyond 240°C.
Replace the Hot End:
To achieve higher temperatures, switch out the default hot end for an all-metal hot end.
Incorporate a bi-metal heat break for improved performance.
IMG Source: redd.it
In conclusion, the Creality Ender-3 V3 SE Nozzle Thermistor stands at the core of your 3D printing experience, regulating temperature and paving the way for flawless prints. By mastering the intricacies of the nozzle thermistor and troubleshooting common issues, you can elevate your printing game to new heights. Remember, the key to pristine prints lies in the hands of this humble yet indispensable component.
Embrace the knowledge shared here and embark on your journey to precision and perfection in 3D printing with confidence.