Ultimate Guide to Creality Ender-3 V3 KE Stepper Motors
Are you looking to enhance the performance of your Creality Ender-3 V3 KE 3D printer with the optimal stepper motors? Dive into this article to explore the specifics of the NEMA17 42-40 stepper motors used in the Ender-3 V3 KE model. Discover detailed specifications, compatibility with various Creality 3D printers, and where you can purchase these high-quality stepper motors.
Let’s delve into the world of Creality Ender-3 V3 KE stepper motors to elevate your 3D printing experience.
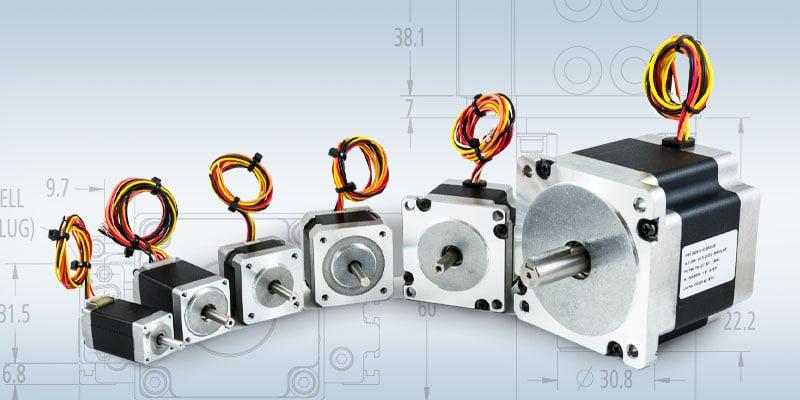
Details of NEMA17 42-40 Stepper Motors
The Creality Ender-3 V3 KE 3D printer utilizes NEMA17 42-40 stepper motors for specific axes. Here are the details about these stepper motors:
Specifications:
Size: NEMA 17 (42x42x40 mm)
Shaft Diameter: 5 mm (D-shaft)
Step Angle: 1.8 degrees
Current: 1.0 A
Compatibility:
These stepper motors are compatible with the following Creality 3D printers:
Ender 3 v3 KE Z-Axis
Ender 3 v3 SE Z-Axis
Sermoon v2 Y-Axis
CR-10 S Pro V1/V2 Z-Axis
CR-X/Pro Z-Axis
Availability:
You can purchase the Creality Ender-3 V3 KE NEMA17 42-40 Stepper Motor for Z-Axis online in Canada. It’s priced at $20.00 and comes with free shipping for orders over $140 before tax.
Key Features of Creality Ender-3 V3 KE 3D Printer
The Creality Ender-3 V3 KE is an impressive 3D printer that combines ease of use with high-speed capabilities. Let’s delve into its key features:
Smart Creality OS: The Ender-3 V3 KE comes equipped with an intuitive touch UI featuring an intuitive tab bar. It provides real-time model previews and vivid motion graphics of printing parameters.
500mm/s Max Printing Speed: This printer is a speed demon, capable of reaching a maximum printing speed of 500mm/s. Whether you’re printing intricate designs or larger objects, the Ender-3 V3 KE can handle it swiftly.
X-axis Linear Rail: To enhance stability and precision, the printer incorporates a linear rail on the X-axis. This ensures smoother movement and more accurate prints.
Smart Self-Test for Z Offset and Auto Leveling: With just one tap, the Ender-3 V3 KE performs self-tests for Z offset and auto leveling. This feature simplifies setup and ensures optimal printing conditions.
Wide Material Compatibility: You can print with various materials, including PLA, PETG, ABS, and TPU.
In summary, the Creality Ender-3 V3 KE is a versatile and efficient 3D printer that combines speed, ease of use, and precision. Whether you’re a beginner or an experienced maker, this printer offers a great balance of features for your 3D printing needs.
IMG Source: media-amazon.com
Installing KE Stepper Motors on Ender-3 V3
Installing KE Stepper Motors on your Ender-3 V3 can enhance performance and precision. Let’s walk through the process step by step:
User Manual and Resources:
Start by referring to the Creality Ender-3 V3 KE User Manual. It provides detailed instructions and visuals for assembly, wiring, and configuration.
You can find additional information and videos on the memory card provided with the printer or visit Creality’s official website. The website includes software, hardware details, contact information, warranty information, and more.
Firmware Upgrade:
To upgrade the WiFi firmware, use Creality Cloud OTA.
For equipment firmware upgrades, visit Creality’s website, navigate to Service Center → Firmware/Software Download, and download the required firmware.
Assembly Procedure:
Follow these steps for successful installation:
Gantry Frame: Assemble the gantry frame components securely.
Display Screen: Attach the display screen to the designated location.
Material Rack and Filament Detection Assemblies: Install these components.
Equipment Wiring: Connect the wires according to the wiring diagram provided in the manual.
Printer Auto Guidance:
The Ender-3 V3 KE offers auto guidance features:
Auto Detection: The printer self-checks for Z offset and auto leveling.
User Interface: Familiarize yourself with the printer’s interface.
Manual Loading: Insert the filament into the extruder.
Auto Feed: The printer assists in feeding the filament.
Explore printing options:
LAN Printing: Set up printing via LAN.
USB Flash Drive Printing: Load your print files from a USB drive.
Equipment Maintenance:
Regular maintenance ensures optimal performance:
Platform Plate Removal: Clean and maintain the platform.
Screw Rod, Optical Axis, and Guide Rail: Keep them clean and lubricated.
Nozzle Replacement: Replace the nozzle when needed.
Equipment Parameters:
Familiarize yourself with the printer’s specifications.
Circuit Connecting:
Ensure proper connections for smooth operation.
For more detailed visuals and step-by-step instructions, refer to the user manual and Creality’s resources.
IMG Source: ytimg.com
Enhancing KE Stepper Motors’ Performance
Optimizing the performance of KE Stepper Motors is crucial for achieving smooth and accurate motion control. Here are the top three ways to enhance their performance:
Choosing the Right Driver for Your Stepper Motor System:
The driver plays a pivotal role in supplying power and controlling the motor’s operation. When selecting a driver, consider factors such as required torque, speed, and overall system requirements.
Bipolar stepper motor drivers are preferred for higher performance and torque. They offer precise and accurate movements due to their higher power output.
Unipolar stepper motor drivers, while easier to operate, may have lower torque capabilities. Always refer to the motor manufacturer’s specifications for compatibility and optimal performance.
Proper Motor Selection and Sizing:
Choose the right motor based on application requirements, including desired speed, torque, and accuracy.
Undersized motors can lead to missed steps or decreased accuracy, while oversized motors result in unnecessary costs and increased power consumption.
Analyze torque requirements and select a motor that comfortably handles the load. Consider parameters like step angle and rotor inertia for optimal motor selection.
Fine-Tuning Motor Parameters and Current Limits:
After selecting the driver and motor, fine-tune motor parameters and current limits.
Properly adjusting these parameters ensures optimal performance.
Additionally, consider implementing microstepping technology, which divides each step into smaller increments for smoother and more precise motion control.
IMG Source: kollmorgen.com
In conclusion, the Creality Ender-3 V3 KE stepper motors play a crucial role in ensuring smooth and precise motion control in your 3D printing endeavors. By understanding the specifications, compatibility, and installation processes outlined in this article, you can optimize the performance of your Ender-3 V3 KE printer with ease. Whether you’re a novice enthusiast or a seasoned maker, utilizing the right stepper motors is key to unlocking the full potential of your printing projects.
Explore the possibilities with Creality Ender-3 V3 KE stepper motors and elevate your 3D printing experience today.