Ultimate Guide to Creality Ender 3 S1 Pro Hotend

Ultimate Guide to Creality Ender 3 S1 Pro Hotend

Are you looking to upgrade your 3D printing game with the Creality Ender 3 S1 Pro hotend? Dive into the world of enhanced performance and precision with this advanced hotend replacement. Discover the steps involved in replacing the hotend, adjusting temperatures, and exploring compatible upgrade options for a seamless 3D printing experience.

Hotend Replacement

The Creality Ender-3 S1 Pro is an upgraded version of the popular Ender-3 3D printer. Let’s dive into details about the hotend and explore some relevant information:

  1. Hotend Replacement:

    • If you need to replace the hotend on your Ender-3 S1 Pro, there are a few steps you can follow:
      • Disassembly: First, disassemble the existing hotend. You’ll need to remove the heat sink, heater block, and nozzle.
      • Temperature Adjustment: Adjust the nozzle temperature to match your printing requirements. For both PLA and PETG, a temperature of around 210°C usually works well.
      • Replacement Options: Consider upgrading to a full metal hotend kit for improved performance. Creality offers the Sprite Extruder Pro Kit, which is compatible with the Ender-3, Ender-3 Pro, Ender-3 V2, and Ender-3 Max 3D printers. It allows printing at temperatures up to 300°C and is a popular choice for direct drive upgrades.
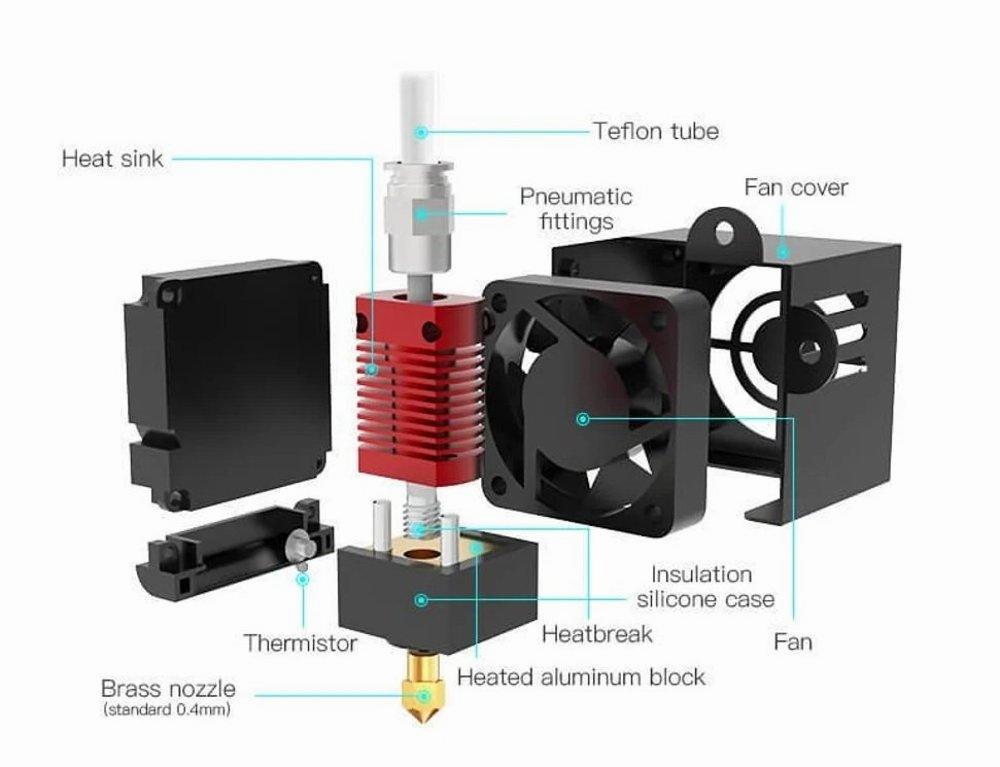
  2. Heat Sink and Nozzle:

    • When disassembling the hotend, pay attention to the heat sink and nozzle:
      • Heat Sink: Remove the two long screws on the breakout board side to detach the heat sink.
      • Nozzle: Removing the nozzle exposes the PTFE tube, which may need replacement after extensive printing. Note that the CR-10 Smart Pro version is all-metal and does not have PTFE in this area.

For more detailed instructions, you can refer to the Creality Cloud service tutorial on replacing the hotend kit. Additionally, there are helpful resources available online, including videos like this one on YouTube.

Impressive Features of Creality Ender 3 S1 Pro 3D Printer

The Creality Ender 3 S1 Pro is an impressive 3D printer that comes with several notable features and technological upgrades. Let’s dive into the details:

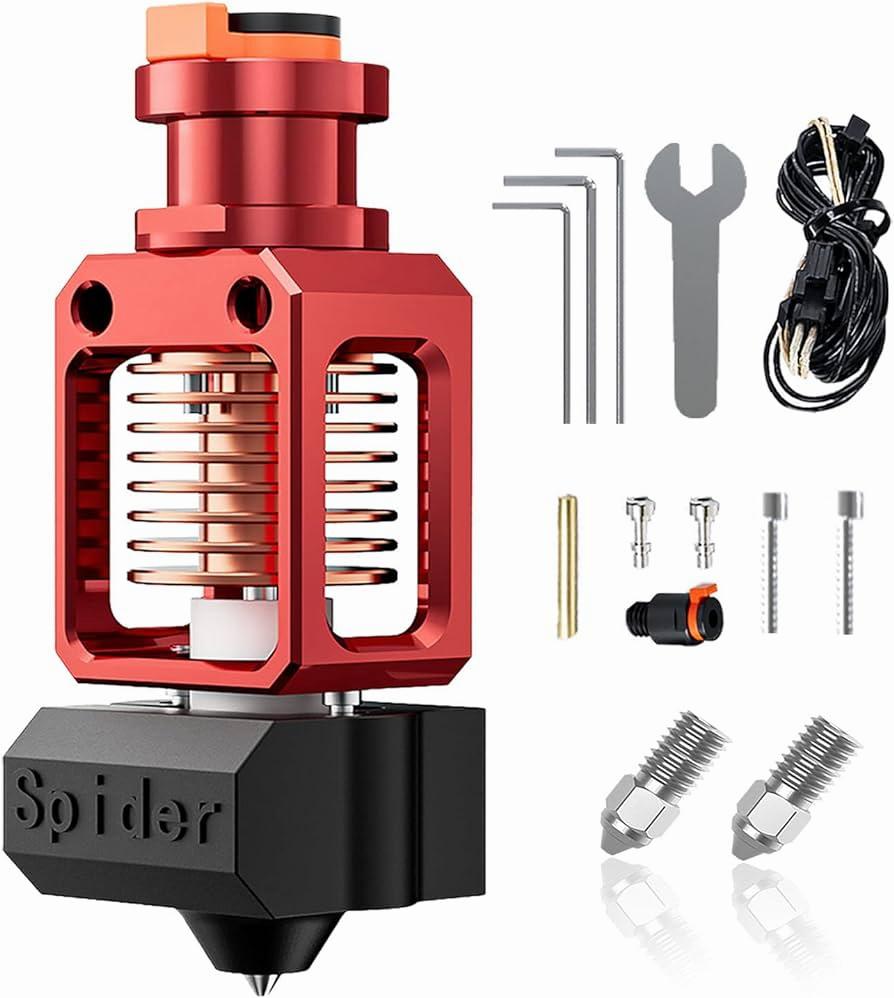
  1. All-Metal Hotend: The Ender 3 S1 Pro boasts Creality’s first all-metal hotend. This design ensures efficient heat transfer and durability during filament melting and extrusion. With an all-metal hotend, you can achieve consistent and uniform material flow for high-quality prints.

  2. PEI Flex Plate: The printer includes a PEI flex plate, which provides excellent adhesion for your prints. PEI (Polyetherimide) is known for its flatness, durability, and ease of use. It allows for easy removal of prints once they cool down, reducing the risk of warping or damage.

  3. Touch Screen: The Ender 3 S1 Pro features a color touch screen, making it user-friendly and convenient to navigate settings and control your prints. The intuitive interface enhances the overall user experience.

  4. Improved Spool Holder: Creality has upgraded the spool holder on the Ender 3 S1 Pro. A well-designed spool holder ensures smooth filament feeding and prevents tangles during printing.

  5. Built-In Light Kit: The printer comes with a built-in light kit, illuminating the print area. This feature is handy for monitoring prints and checking their progress without external lighting.

  6. Core Improvements: In addition to the new features, the Ender 3 S1 Pro retains core improvements from the S1 version:

    • Direct Drive: The printer uses a direct drive extruder, which improves filament control and reduces the risk of filament jams.
    • Dual Z Axis: Dual Z-axis rods enhance stability and precision during layer alignment.
    • Auto Bed Leveling: The CR Touch system ensures accurate bed leveling automatically.
    • Full-Sized SD Card Slot: Conveniently load your print files using a full-sized SD card.

While the Ender 3 S1 Pro is priced higher than its budget-friendly counterparts, it offers a comprehensive package of features that can save you time and enhance your 3D printing experience. Whether you’re a seasoned maker or a newcomer, this printer is worth considering for its quality prints and ease of use.

A photo of the contents of the box which includes a metal hotend kit with a red heatsink and a white motor, and various accessories.

IMG Source: media-amazon.com


Assembling the Creality Ender 3 S1 Hotend

Let’s walk through the process of assembling the Creality Ender 3 S1 hotend. This guide will help you get started with your printer. If you already have the printer or just want to understand the assembly process, keep reading.

Unboxing and Initial Setup

  1. Unboxing: Begin by unboxing your Ender 3 S1. The printer components are securely packaged in foam box inserts. Remove the top insert to reveal the main pieces of the 3D printer.
  2. Main Components: The printer base assembly and gantry frame assembly are the primary components. Additionally, you’ll find a set of tools, hardware, an SD card with ready-to-print files, and some sample PLA filament.

Assembly Steps:

  1. Mount the Extruder Assembly to the Gantry Frame:

    • The Ender 3 S1 comes with a direct drive extruder that’s already assembled. You’ll need to mount it to the gantry frame using the 4 M3x6 screws (the smallest ones).
    • Align the 4 holes on the extruder assembly with the extruder carriage, then use the M3 Allen wrench to tighten the screws.
  2. Mount the Gantry Frame to the Printer Base:

    • The gantry frame attaches to the printer base using the 4 largest screws (two on each side).
    • Insert the screws underneath the printer base. We recommend installing it by resting the printer base on its side, allowing both pieces to rest while you insert the screws.

Additional Notes:

  • The Ender 3 S1 is easier to set up than the Ender 3 V2 since many components come pre-assembled and pre-wired.
  • The entire assembly process typically takes about 15-30 minutes, depending on your experience level.
  • You’ll only need the Allen wrenches included with the printer for assembly.
  • If you have an Ender 3 S1 Pro, you can still follow this guide—the assembly process is almost identical. The S1 Pro includes an additional LED strip, which is straightforward to install.

For more detailed instructions and visuals, you can refer to the Creality Ender 3 S1 Assembly Guide on Creality Experts’ website.

The image shows an exploded view of the components of a 3D printer hotend.

IMG Source: 3dprinteraccessories.shop


Key Features of the Creality Ender 3 S1 Pro

The Creality Ender 3 S1 Pro is an upgraded version of the popular Ender 3 3D printer. Let’s dive into its features and performance:

  1. All Metal Hotend: The Ender 3 S1 Pro boasts Creality’s first all-metal hotend, which enhances temperature stability and allows for printing with a wider range of materials.

  2. PEI Flex Plate: The printer comes with a PEI flex plate, making it easier to remove prints without damaging the build surface.

  3. Touch Screen: The inclusion of a touch screen simplifies navigation and control, improving the user experience.

  4. Improved Spool Holder: Creality has upgraded the spool holder, ensuring smoother filament feeding during printing.

  5. Built-in Light Kit: The built-in light kit illuminates the print area, making it easier to monitor your prints.

  6. Core Improvements: The Ender 3 S1 Pro retains core improvements from the S1 version, such as direct drive, dual Z-axis, auto bed leveling, and a slot for a full-sized SD card.

Despite these enhancements, the Ender 3 S1 Pro comes at a higher price point compared to basic Ender 3 models. While it’s not as expensive as the Prusa MK3S+ kit, it offers a compelling package for those seeking a feature-rich 3D printer. Keep in mind that many of the upgrades found in the S1 Pro can also be retrofitted to classic Ender 3 printers if you’re willing to invest in parts and do the upgrades yourself.

Here are the key specifications of the Creality Ender 3 S1 Pro:

  • Machine Footprint: 6490 x 455 x 625 mm (19.2 x 18 x 24.5 inches)
  • Build Volume: 220 x 220 x 270 mm (8.5 x 8.5 x 10.5 inches)
  • Material Compatibility: PLA/PETG/TPU/ABS
  • Extruder Type: Direct Drive
  • Nozzle Diameter: 0.4mm (Interchangeable)
  • Filament Runout Sensor: Yes
  • Bed Leveling: CR Touch
  • Connectivity: SD card, Type-C USB Interface
  • Color Touch Screen: Included in the box

In summary, the Creality Ender 3 S1 Pro offers quality prints, ease of assembly, and a host of features that make it a worthy contender in the 3D printing world.

A photo of a red metal hotend with a black fan, and a variety of tools and parts laid out beside it.

IMG Source: media-amazon.com


Essential Maintenance Tips for Creality Ender 3 S1 Pro Hotend

Proper maintenance of your Creality Ender 3 S1 Pro hotend is essential for optimal 3D printing performance. Here are some tips to keep your hotend in good shape:

  1. Clean the Hotend Throat:
    Regularly clean the hotend throat to prevent clogs. Follow these steps:

    • Power off your printer.
    • Remove both mount screws on the hotend cover.
    • Carefully access the inside of the hotend.
    • Use tweezers to remove any dirt, debris, or pet hair from inside and on the fan blades.
  2. Check Fan Blades and Heat Sink:

    • Ensure that the fan blades are clean and free from dust, hairs, and lint.
    • Inspect the heat sink for any accumulated debris or blockages.
  3. Inspect Belts and Gears:

    • Tighten the belts to maintain proper tension.
    • Check the feed gears for cleanliness and wear. Remove any filament buildup.
  4. Monitor Hotend Temperature:

    • Make sure the hotend temperature remains within the recommended range.
    • Avoid excessive heating, which can lead to filament degradation.

A blue Capricorn Bowden tube, a pneumatic coupler, and a brass nozzle on a white background.

IMG Source: ytimg.com


In conclusion, the Creality Ender 3 S1 Pro hotend offers a gateway to improved printing quality and efficiency. With features like an all-metal hotend, PEI flex plate, touch screen interface, and enhanced spool holder, this printer is a blend of innovation and practicality. Whether you’re a seasoned enthusiast or a newbie to 3D printing, investing in the Creality Ender 3 S1 Pro hotend can elevate your printing experience to new heights.

Take advantage of its core improvements such as direct drive technology, dual Z-axis stability, and auto bed leveling for consistent and reliable prints. Don’t compromise on quality when you can achieve precision and performance with the Creality Ender 3 S1 Pro hotend.

Comments

    Leave a Reply

    Your email address will not be published. Required fields are marked *