The Ultimate Guide to Creality Ender 3 S1 Pro Extruder

The Ultimate Guide to Creality Ender 3 S1 Pro Extruder

Welcome to a comprehensive exploration of the Creality Ender 3 S1 Pro Extruder. In this article, we will delve into the intricate details and features of this innovative extruder that sets the Ender 3 S1 Pro apart as a top-tier 3D printer. From its advanced capabilities to its streamlined design, we will uncover why the Creality Ender 3 S1 Pro Extruder stands out in the realm of 3D printing technology.

Features of the Creality Ender 3 S1 Pro ‘Sprite’ Extruder

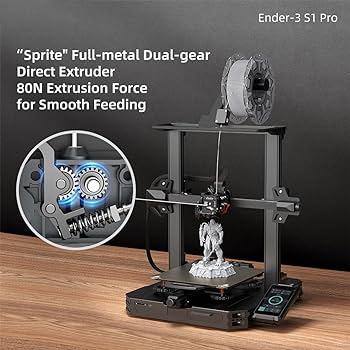
The Creality Ender 3 S1 Pro 3D printer features an advanced “Sprite” full-metal dual-gear direct extruder. Let’s delve into the details of this intriguing extruder:

  1. Extrusion Force: The “Sprite” extruder boasts an impressive 80N extrusion force, ensuring smooth filament feeding. This robust force helps maintain consistent material flow during printing.

  2. Hot End and Extruder Integration: Unlike most other Creality printers that use a Bowden extruder, the Ender 3 S1 Pro’s hot end and extruder are integrated into a single unit. This design streamlines the assembly and reduces the need for additional wiring connections. The hot end comes fully assembled when you purchase the printer, making it a complex yet efficient device.

  3. Breakout Board: The “Sprite” hot end features a breakout board with plug-in connection interfaces for all hot end and extruder components. While this simplifies component replacement, it’s essential to note that thermistors and heat cartridges with these connectors are not readily available for purchase at the moment. However, other components like the CR-touch auto-leveling sensor and fans come with plug-in connectors by default, making them easy to replace.

  4. Detaching the Heat Sink: To access the small section of PTFE tubing within the hot end (a wear item that may need replacement after extensive printing), you can detach the heat sink from the extruder assembly. Removing the two long screws on the breakout board side allows you to perform this maintenance task without fully disassembling the hot end.

In summary, the Ender 3 S1 Pro’s “Sprite” extruder combines functionality, efficiency, and ease of maintenance, making it a compelling choice for high-temperature printing with various filaments

Features and Upgrades

The Creality Ender 3 S1 Pro is an upgraded version of the popular Ender 3 3D printer. Let’s dive into the details:

  1. Features and Upgrades:

    • The Ender 3 S1 Pro comes with several enhancements, making it a compelling choice for those seeking an improved 3D printing experience.
    • All-Metal Hotend: Creality equipped this printer with its first all-metal hotend. This upgrade allows for higher-temperature printing (up to 300°C) and eliminates the need for a PTFE tube inside the heat break.
    • PEI Flex Plate: The printer includes a PEI flex plate, which provides better adhesion for prints and simplifies bed leveling.
    • Touch Screen: The Ender 3 S1 Pro features a touch screen interface, enhancing user interaction.
    • Improved Spool Holder: A better spool holder design ensures smoother filament feeding.
    • Built-In Light Kit: The addition of a built-in light kit illuminates the print area.
    • Direct Drive: The printer retains the direct drive system for improved filament control.
    • Dual Z Axis: Dual Z-axis rods enhance stability during printing.
    • Auto Bed Leveling: No more manual bed leveling—this printer does it automatically.
    • Full-Sized SD Card Slot: Conveniently access your files using a full-sized SD card.
    • Price: Retailing at $479, the Ender 3 S1 Pro is pricier than its budget-friendly predecessors but offers significant upgrades.
  2. Pros and Cons:

    • Pros:
      • Quality prints
      • Easy assembly
      • Auto bed leveling
      • Direct drive
      • Touch screen
    • Cons:
      • Odd cooling fan placement
      • Menu not user-friendly
  3. Comparison:

    • While the Ender 3 S1 Pro is a substantial improvement over the basic Ender 3 models, it’s still more expensive than the classic Ender 3s available in the market.
    • The budget Ender 3s remain popular due to their upgradability. Most features of the Ender 3 S1 Pro can be retrofitted onto a classic Ender 3 with additional parts and effort.

In summary, the Creality Ender 3 S1 Pro offers a host of upgrades, making it a solid choice for those who want a feature-rich 3D printer without compromising on quality. However, consider your budget and whether the additional features justify the higher price point.

The image shows a Creality Sprite Pro Extruder Kit with Capricorn Bowden Tubing.

IMG Source: all3dp.com


Extruder Precision for 3D Printing

Extruder precision plays a crucial role in achieving accurate and reliable 3D prints. Let’s delve into what it means and how you can optimize it:

  1. What is Dimensional Accuracy in 3D Printing?

    • Dimensional accuracy refers to how closely a finished 3D-printed model aligns with the dimensions specified in the original design file.
    • While minor deviations are expected, better accuracy ensures that your printed object closely matches your intended dimensions.
  2. Why Is Dimensional Accuracy Important?

    • For decorative or static prints, slight inaccuracies may not be noticeable to the naked eye.
    • However, when printing functional parts (e.g., gears, machine components), precise dimensions are critical for optimal performance.
    • Inaccurate prints can lead to unreliable or non-functional parts.
  3. Factors Affecting Dimensional Accuracy:

    • Several factors impact extruder precision:
      • Printer Settings: Properly configure your printer settings, including layer height, infill density, and print speed.
      • Hardware Issues: Ensure your printer frame is sturdy and well-assembled.
      • Extrusion Problems: Monitor filament flow, nozzle cleanliness, and retraction settings.
      • Filament Types: Different materials may exhibit varying shrinkage or warping behaviors.
  4. How to Improve Dimensional Accuracy:

    • Here are practical steps to enhance extruder precision:
      • Double-Check Axes Settings: Calibrate X, Y, and Z axes to minimize misalignment.
      • Inspect Printer Frame: A stable frame reduces vibrations during printing.
      • First Layer Impact: Achieve proper first-layer adhesion for consistent prints.
      • Optimize Print Speed: Adjust speed settings to balance accuracy and efficiency.
      • Monitor Extruder Temperature: Maintain the correct temperature for your filament.
      • Heat Bed Temperature: Ensure the heat bed is at the right temperature.
      • Check for Extrusion Issues: Address clogs, under-extrusion, or over-extrusion.
      • Clean Your Nozzle: Regularly clean the extruder nozzle.
      • Alter Retraction Settings: Optimize filament retraction to prevent stringing.

A close-up of a 3D printers extruder, which is a device that melts plastic filament and extrudes it through a nozzle to create a 3D object.

IMG Source: 0x7d.com


Creality Ender-3 S1 Pro Extruder Installation Guide

Let’s dive into the installation and maintenance guide for the Creality Ender-3 S1 Pro 3D printer’s extruder. Below are the steps you need to follow:

  1. List of Main Parts:

    • Before installation, familiarize yourself with the main components of the printer. These include the nozzle module, wire clamp, gantry, screen, and rack.
    • Ensure safety precautions: Do not use the printer in ways not described in the manual, avoid placing it near flammable or explosive materials, and keep it in a well-ventilated environment.
  2. Install the Printer:

    • Nozzle Module and Wire Clamp:
      • Place the nozzle module on the back of the extruder.
      • Pre-lock the nozzle with 4 M3x6 hexagon socket head cap screws and tighten them.
      • Clamp the wire clamp onto the X motor black plate.
    • Gantry Installation:
      • Move the right profile of the bottom module 35 mm out to reveal the installation hole.
  3. Screen Installation:

    • Place the screen bracket to the side of the plastic on the right.
    • Tighten it with 3 M4x30 hexagon flat round head screws.
  4. Rack Installation:

    • Find the filament tube fittings.
    • Fix the threaded end of the tube on the right end of the rack.
    • Fit the front slot of the installed rack to the front slot of the profile and press down to clamp the bottom of the profile.
  5. Auto Leveling:

    • Connect the nozzle to the 24-pin port.
    • Follow the yellow label on the 6-pin (4 wires) port to connect the X-axis and Z-axis stepper motors.
    • Connect the X-axis limit motor according to the yellow label on the 3-pin (2 wires) port.
    • Connect the 3-pin (3 wires) 2.0 port to the pinboard and the 3-pin (3 wires) 2.54 port to the filament detector.
  6. Assisted Leveling:

    • Enter the assisted leveling interface.
    • Adjust the Z-axis compensation value so that the height from the nozzle to the printing platform is about the thickness of a piece of A4 paper.

Remember to refer to the user manual

For further information, you can also explore the official Creality Ender-3 S1 Pro page for software, firmware, and additional resources.

The image shows the Bowden tube, which is a thin tube that connects the extruder to the hot end.

IMG Source: squarespace-cdn.com


Key Features of the Creality Ender 3 S1 Pro

The Creality Ender 3 S1 Pro is a feature-packed 3D printer that builds upon the popular Ender 3 series. Let’s delve into some of the user experiences and features of this printer:

  1. Quality Prints: Users appreciate the Ender 3 S1 Pro’s ability to produce high-quality prints. Whether you’re creating miniatures, fun models, or even more professional prototypes, this printer delivers.

  2. Easy Assembly: Setting up the Ender 3 S1 Pro is straightforward. It comes with all the necessary tools, including side cutters, a metal scraper, and a spare nozzle. You’ll find everything you need in the box.

  3. Auto Bed Leveling: The printer features auto bed leveling, which saves you time and ensures a level print surface. No more manual adjustments!

  4. Direct Drive Extruder: Creality equipped the Ender 3 S1 Pro with its first all-metal hotend and a direct drive extruder. This design choice contributes to better filament control and smoother extrusion.

  5. Touch Screen: The inclusion of a touch screen simplifies navigation and control. You can interact with the printer’s settings more intuitively.

  6. PEI Flex Plate: The PEI flex plate enhances print adhesion and makes removing finished prints easier.

  7. Built-in Light Kit: The built-in light kit illuminates the print area, making it convenient to monitor your prints.

  8. Dual Z Axis: The dual Z-axis setup ensures stability and accuracy during printing.

  9. Full-Sized SD Card Slot: You can use a full-sized SD card for storing and transferring print files.

  10. Price and Upgrades: Retailing at $479, the Ender 3 S1 Pro is pricier than basic Ender 3 models but offers significant upgrades. While the budget-friendly Ender 3s remain popular due to their upgradability, the S1 Pro comes fully loaded, saving you the hassle of aftermarket modifications.

Remember that no printer is perfect, and the Ender 3 S1 Pro has a couple of minor drawbacks, such as an odd cooling fan placement and a less user-friendly menu. However, overall, it’s a solid choice for both beginners and experienced 3D printing enthusiasts.

If you’re interested, you can find the Creality Ender 3 S1 Pro on Amazon for $284.05.

The image shows the Creality Ender-3 S1 Pro 3D printer with a metal dual-gear direct extruder that provides 80N of extrusion force for smooth feeding of filament.

IMG Source: media-amazon.com


In conclusion, the Creality Ender 3 S1 Pro Extruder showcases a blend of precision, efficiency, and ease of maintenance that make it an appealing choice for enthusiasts and professionals alike. With features like an all-metal hot end, auto bed leveling, and a direct drive system, this extruder elevates the printing experience to new heights. While it carries a slightly higher price tag compared to its predecessors, the Ender 3 S1 Pro Extruder offers significant upgrades that justify the investment.

Whether you’re seeking quality prints, easy assembly, or advanced features, the Creality Ender 3 S1 Pro Extruder delivers on all fronts, making it a compelling option for your 3D printing needs.

Comments

    Leave a Reply

    Your email address will not be published. Required fields are marked *