Ultimate Guide to Bambu Lab X1 Nozzle Thermistor

Ultimate Guide to Bambu Lab X1 Nozzle Thermistor

Are you looking to enhance the performance of your Bambu Lab X1 and X1C 3D printers with the perfect accessory? Delve into the world of the Bambu Lab X1 Nozzle Thermistor – a key component for precise temperature management in your 3D printing process. Discover the features, benefits, and installation tips that make this thermistor a must-have for maximizing your printing experience.

Bambu Lab X1 and X1C 3D Printers Thermistor Details

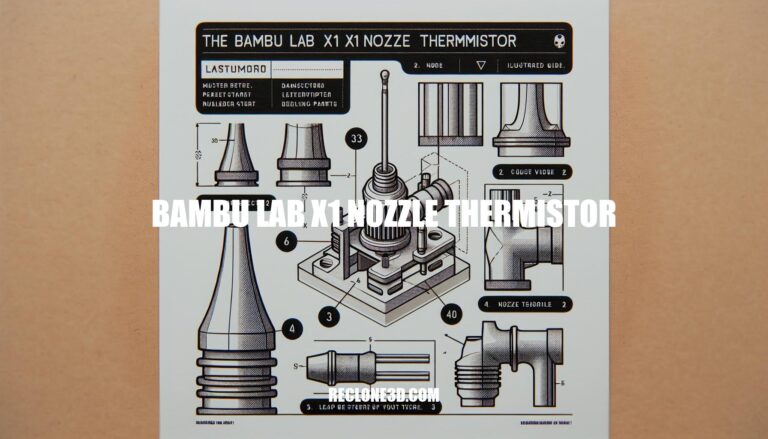
The Bambu Lab X1 and X1C 3D printers utilize a specific thermistor for temperature measurement. Here are the details:

Key Features of Bambu Lab X1 Nozzle Thermistor

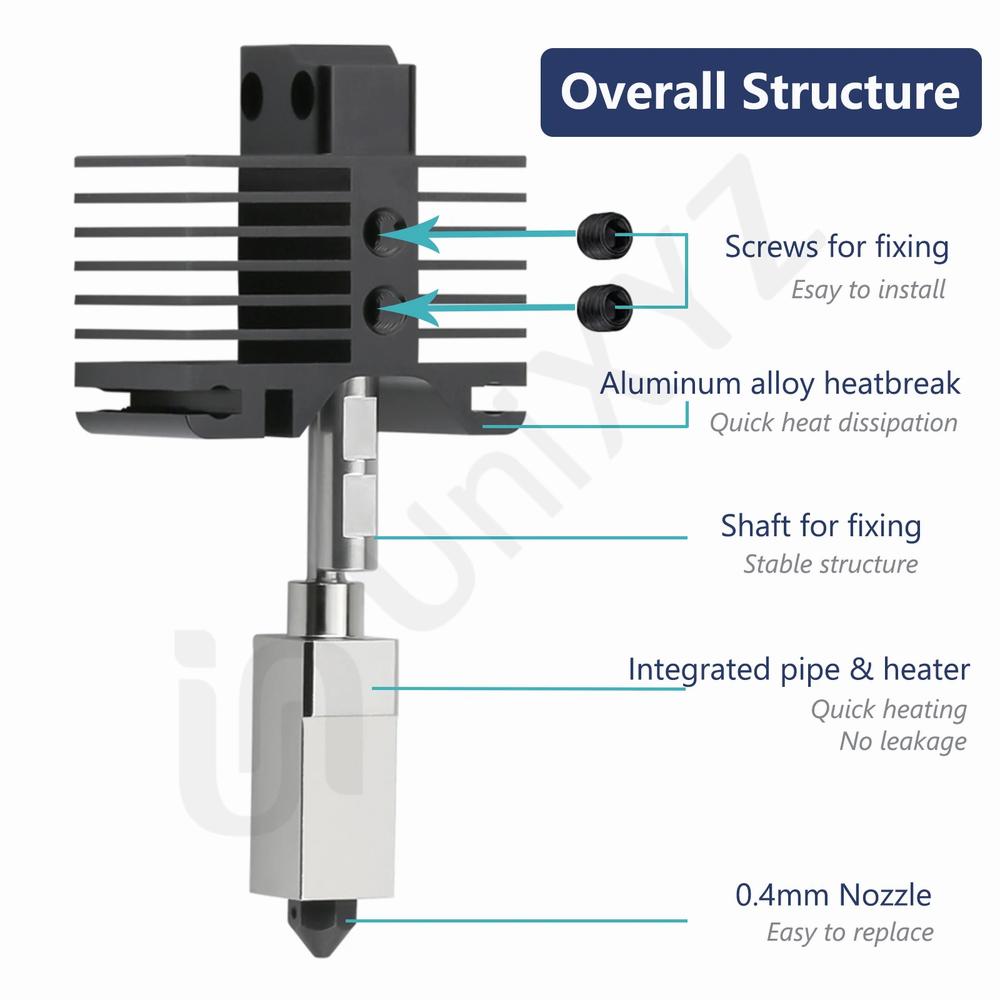
The Bambu Lab X1 Nozzle Thermistor offers several features and benefits for users. Let’s delve into the details:

  1. Highly Accurate Temperature Measurement: The thermistor provides precise temperature readings, ensuring optimal performance in your 3D printing process.

  2. Reliable Structural Design: Bambu Lab has designed the thermistor with reliability in mind. It can withstand the demands of 3D printing and maintain consistent performance.

  3. Compatibility: The X1 Nozzle Thermistor is specifically intended for use with Bambu Lab’s complete hotend assembly for the X1 and X1C models (please note that it is not compatible with X1E).

  4. Easy Installation: If you need to replace the thermistor, you can find detailed instructions on the Bambu Lab Wiki.
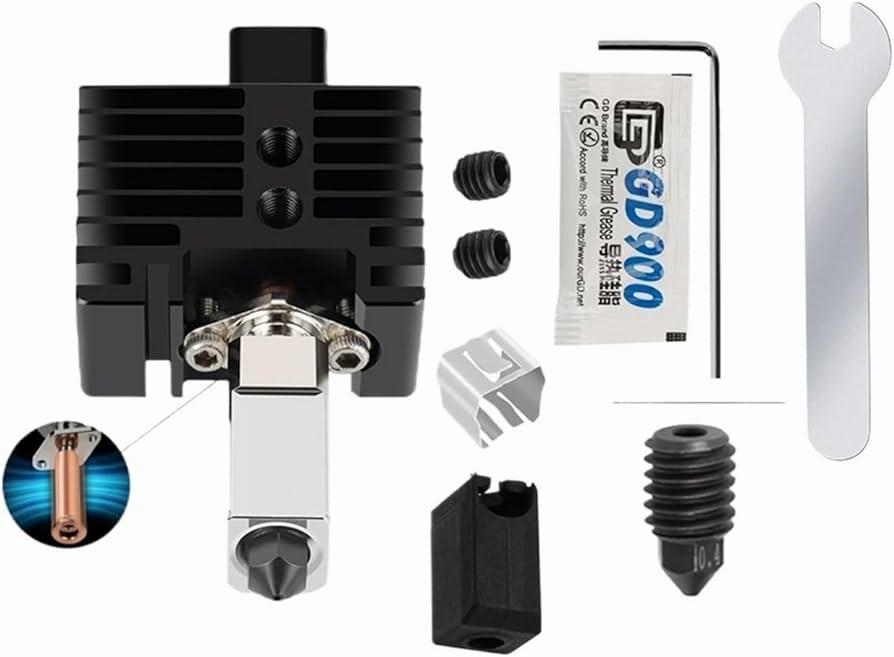
  5. In the Box:

    • Three thermistors
    • Three thermal grease packets
    • Three retaining clips
  6. Operating Temperature Range: The thermistor can handle temperatures from -10°C to 300°C.

For more information, you can visit the Bambu Lab X1 Series page or explore the product listing on Bambu Lab’s website.

The image shows the parts of the upgraded version of the 3D printer hotend kit.

IMG Source: alicdn.com


Installation and Calibration Guide for Bambu Lab X1 Nozzle Thermistor

To install and calibrate the Bambu Lab X1 Nozzle Thermistor, follow these steps:

  1. Disassembly:

    • Turn off your 3D printer and unplug it.
    • Remove the existing hotend assembly. Refer to the Bambu Lab Wiki for detailed instructions on hotend replacement.
    • Disconnect the old thermistor from the hotend.
  2. Installing the New Thermistor:

    • Identify the new thermistor. It should come with the Bambu Lab X1 Nozzle Thermistor kit.
    • Attach the new thermistor to the hotend. Ensure proper alignment and secure it in place.
    • Connect the thermistor wires to the designated connector on your printer’s control board.
  3. Calibration:

    • Power on your 3D printer.
    • Access the printer’s settings or menu.
    • Navigate to the temperature calibration section.
    • Select the option to calibrate the nozzle thermistor.
    • Follow the on-screen prompts to set the correct temperature values.
    • Test the thermistor by heating the nozzle and verifying that the temperature readings are accurate.
  4. Final Checks:

    • Run a test print to ensure the thermistor is functioning correctly.
    • Monitor the temperature during the print to verify stability.
    • Make any necessary adjustments based on the calibration results.

Remember to consult the official Bambu Lab Wiki for specific details related to your printer model and any additional considerations

For more Bambu Lab tutorials and discussions, check out their official store and Facebook Group.

A close up of a Creality 3D printer motherboard with a red circle around the nozzle clip on top of the thermistor connector.

IMG Source: bambulab.com


Tips for Maximizing Bambu Lab X1 Nozzle Thermistor Usage

To maximize the usage of the Bambu Lab X1 Nozzle Thermistor, consider the following tips:

  1. Quality Filaments: Use high-quality filaments without abrasive additives like carbon fiber or glass fiber. These additives can cause wear and clogging in the nozzle. If you do use such filaments, consider switching to a hardened steel 0.6 mm nozzle to minimize the risk of clogs and abrasion.

  2. Regular Maintenance: Keep your hotend assembly clean and well-maintained. Regularly inspect the nozzle and thermistor for any signs of wear, debris, or damage. Clean them as needed to ensure accurate temperature readings.

  3. Calibration: Ensure that your printer’s temperature settings are calibrated correctly. Incorrect temperature readings can affect print quality and nozzle performance. If you encounter temperature-related issues, such as sudden drops or malfunctions, check the thermistor’s connection and calibration.

  4. Nozzle Replacement: If you notice any issues with the nozzle or thermistor, consider replacing them promptly. Follow proper procedures for replacing the nozzle to avoid damaging the hotend assembly. There are helpful videos available online that demonstrate how to replace the nozzle on your BambuLab X1.

The image shows two versions of a hotend for a Bambu Lab P1P, P1S, X1, or X1C 3D printer.

IMG Source: alicdn.com


Bambu Lab X1 Carbon 3D Printer Nozzle Thermistor Reviews

Let’s explore some customer reviews related to the Bambu Lab X1 Carbon 3D printer and its nozzle thermistor. Here’s what users have experienced:

  1. Reddit User Wat_a_wookie:

    • After pulling off the toolhead to clear a clog, they encountered a nozzle temperature malfunction upon reinstallation. Despite replacing the thermistor wire, the issue persisted. They opened a case with Bambu Lab but were curious if there might be a trick to resolve it.

      Additionally, they found the cable tricky to reinstall.

  2. Reddit User coupleinftworth:

    • They faced a similar issue when swapping out the stock 0.4mm nozzle for a 0.2mm nozzle. The entire housing came off the toolhead board, and even after replacement, the same error persisted. They contacted support and were waiting for a reply.
  3. Reddit User FireBuffalo19:

    • FireBuffalo19 replaced a clogged nozzle with the spare hot end that came with the printer. However, they encountered the error message: “The nozzle temperature is abnormal; the sensor may have an open circuit” .
  4. Reddit User worldspawn00:

    • They suggested reseating all the cables on the board. Loose connections can cause issues with sensors. Thermistors do not have a specific orientation, so as long as the connector is fully seated, it should work correctly.
  5. Reddit User Total_Justice:

    • Total_Justice faced the same issue on their new X1 Carbon. After replacing the tool head board, the problem persisted. They highlighted a design flaw where a shorted thermistor could damage the tool head-mounted board.

      Despite waiting for a month, the printer remained unusable.

  6. Tom’s Hardware Review:

    • The Bambu Lab X1-Carbon is praised for its rigid steel frame, aluminum shell, CoreXY motion system, and LIDAR-assisted automatic calibration. However, some cons include the absence of a PEI Textured Plate, material wastage during the default purging process, and the complexity of nozzle replacement.
  7. Looria Review:

    • Reviewers appreciate the X1 Carbon’s ability to print high-temperature materials and its aluminum/glass enclosure. Some even prefer it over the Prusa MK3S+ due to its modern features. However, additional options like a camera and multicolor printing are desired by some users.
  8. All3DP Review:

    • The Bambu Lab X1 Carbon (AMS) is described as feature-packed and more than just a pretty face. It offers fresh thinking and a hassle-free experience without the need for tinkering.

In summary, the Bambu Lab X1 Carbon is well-regarded for its premium features, ease of use, and innovative capabilities. However, some users have encountered nozzle temperature malfunctions, emphasizing the importance of reliable customer support and robust design.

A photo of a black metal hotend for a 3D printer, with a silver heat sink, and a variety of tools and accessories.

IMG Source: media-amazon.com


In conclusion, the Bambu Lab X1 Nozzle Thermistor stands out as a reliable and essential component for temperature measurement in your 3D printing endeavors. Its accuracy, structural design, and compatibility with the X1 and X1C models make it a valuable addition to your toolkit. By following the installation and calibration steps outlined, you can ensure optimal performance and quality prints.

Remember to prioritize regular maintenance, calibration, and nozzle replacement to maximize the longevity and efficiency of your Bambu Lab X1 Nozzle Thermistor. Stay informed, stay precise, and keep creating with confidence.

Comments

    Leave a Reply

    Your email address will not be published. Required fields are marked *