Enhance 3D Printing with Anycubic Kobra 2 Neo Extruder
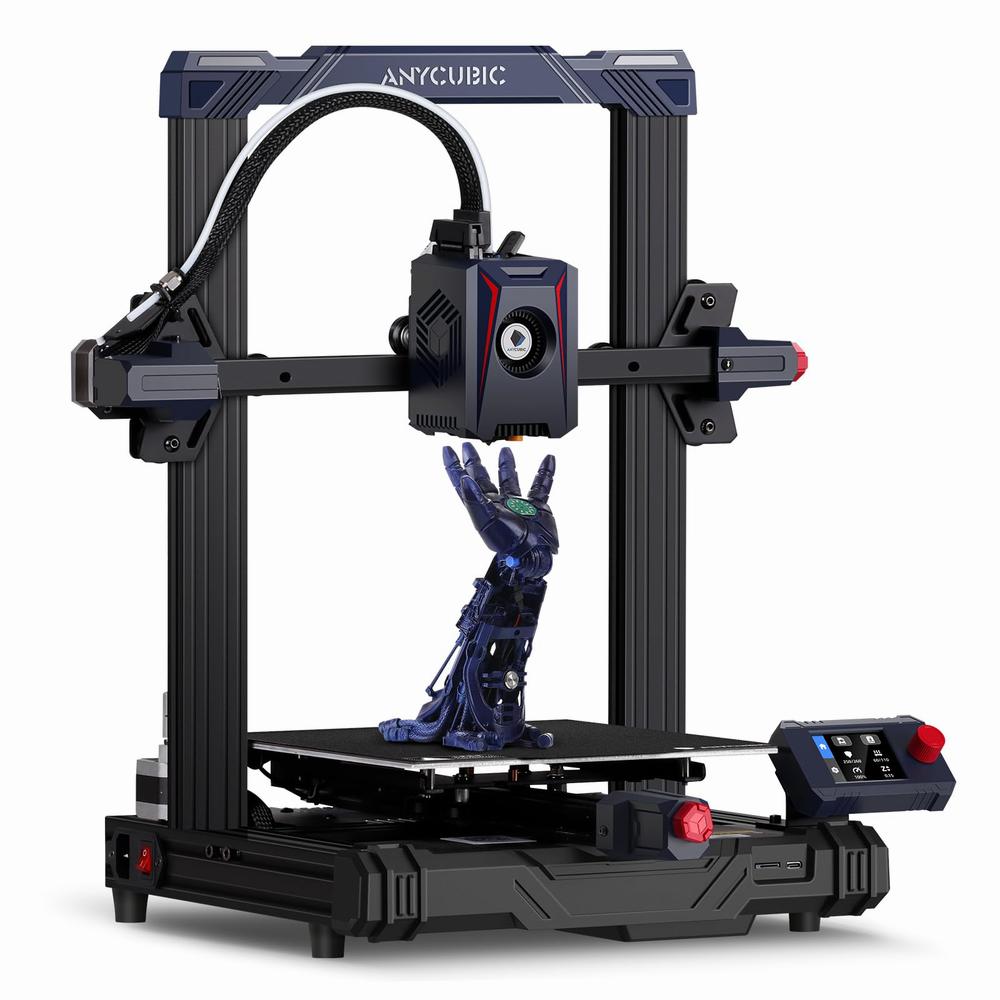
Embark on a journey of precision and affordability with the Anycubic Kobra 2 Neo, a fast-speed 3D printer priced under $200. Imagine creating intricate designs at speeds of up to 250mm/s, setting a new standard of motion in quality. With its upgraded extrusion system and 60W hot end, this printer ensures rapid melting and molding of filaments, complemented by a high-performance 7000 rpm cooling fan.
Whether you’re a seasoned enthusiast or a beginner looking to enhance your printing experience, the Anycubic Kobra 2 Neo Extruder is a compelling choice for your 3D printing needs.
Elevate Your Printing with Anycubic Kobra 2 Neo
The Anycubic Kobra 2 Neo is a fast-speed 3D printer priced under $200. It offers impressive printing speeds of up to 250mm/s, ensuring motion in quality. Elevate your printing endeavors with precision and affordability.
The newly upgraded extrusion system in the Kobra 2 Neo features a 60W hot end that melts filaments quickly. Additionally, it comes equipped with a 7000 rpm cooling fan to ensure rapid cooling and precise molding of your 3D models.
If you’re looking to replace or upgrade your Anycubic FDM printer extruder, this could be a prime choice. It’ll help you maintain optimal functionality and achieve reliable printing results
Key Features of Anycubic Kobra 2 Neo
The Anycubic Kobra 2 Neo offers several benefits that make it an attractive choice for 3D printing enthusiasts:
High-Speed Printing: The Kobra 2 Neo boasts impressive printing speeds of up to 250mm/s, allowing you to create your designs swiftly and efficiently.
Linear Propulsion and Input Shaping: By applying linear propulsion and input shaping functions in the Marlin firmware, this printer reduces spillage, enhances print quality, and ensures smoother and clearer model details. Even beginners can produce high-quality prints with ease.
Dual-Gear Extruder: The dual-gear extruder ensures faster and more stable filament gripping and extrusion. This feature contributes to reliable and consistent printing results.
Durable Metal Materials: The use of durable metal materials in the Kobra 2 Neo simplifies subsequent maintenance for users. It’s a printer built to last.
Affordability: Priced under $200, the Kobra 2 Neo provides an excellent balance of precision, speed, and affordability, making it an ideal choice for entry-level 3D printing enthusiasts.
IMG Source: media-amazon.com
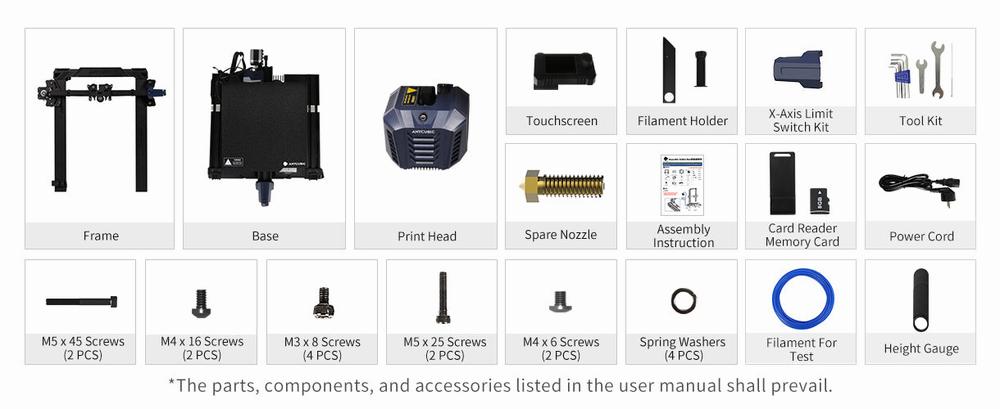
Anycubic Kobra 2 Neo Installation Guide
Let’s dive into the installation process for the Anycubic Kobra 2 Neo extruder. This guide will help you get your printer up and running smoothly.
Prepare Your Workspace:
Find a well-lit and clean area to work on your printer.
Make sure you have all the necessary tools and components ready.
Unboxing and Inspection:
Carefully unbox your Anycubic Kobra 2 Neo.
Inspect the contents to ensure everything is intact.
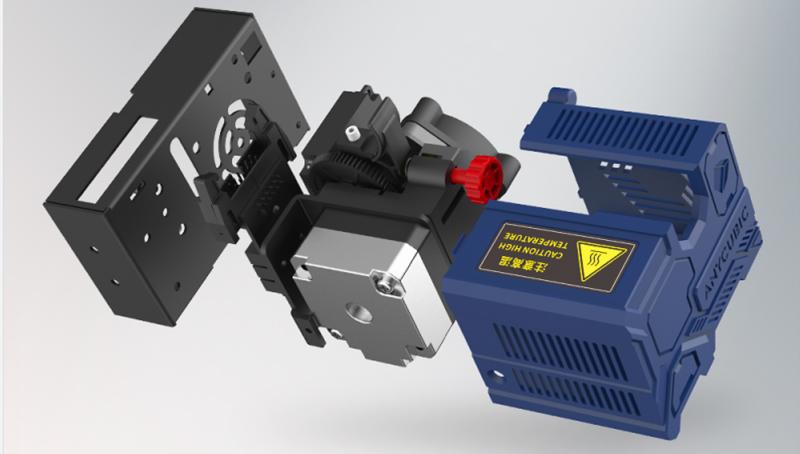
If you suspect that the direct extruder is faulty, follow these steps:
Cut off any zip ties securing the X-axis bracket.
Turn the coupler to raise the X-axis (back side).
Install the frame, ensuring that the Z aluminum beam is accurately mounted onto the groove of the base aluminum beam.
Assembly and Setup:
The Kobra 2 Neo boasts ease of use and a modular design, allowing you to complete assembly within ten minutes.
Follow the instructions in the Quick Start Guide for Anycubic Kobra 2 Neo to fast assemble, inspect before power-up, and initially set up your printer.
First Print:
Once your printer is assembled and powered up, load your filament.
Calibrate the bed and nozzle height.
Start your first print and enjoy the magic of 3D printing!
Remember to refer to the official Anycubic Kobra 2 Neo User Manual for detailed instructions and safety precautions
IMG Source: shopify.com
Essential Extruder Maintenance Tips
Proper maintenance of your Anycubic Kobra 2 Neo extruder is essential for optimal 3D printing performance. Let’s dive into some tips to keep your extruder in top shape:
Regular Cleaning:
Remove accumulated filament, dust, and other residues from the extruder and nearby parts. Regular cleaning helps maintain the extruder’s functionality and prevents clogs.
Pay attention to the gear teeth and other moving parts. Lightly lubricate them with a suitable lubricant to reduce friction.
Check Components:
Inspect for loose parts, screws, and any signs of physical damage or wear.
Ensure that all components are securely in place to avoid unexpected issues during printing.
Troubleshooting Common Issues:
Filament Stuck or Clogging:
If filament gets stuck or clogs, check the nozzle temperature. Adjust it to the optimum temperature for the printing material you’re using.
Clean the nozzle if it’s blocked by debris or filament. Be cautious when handling the hot nozzle.
Abnormal Sound from the Extruder:
Unusual noises may indicate misalignment or mechanical issues. Inspect the extruder assembly and make necessary adjustments.
Other Abnormalities:
If you notice any other irregularities, investigate promptly. It could be related to tension, alignment, or wear.
For more detailed information, you can refer to Anycubic’s official guide on Exploring the Direct Extruder: Troubleshooting and Maintaining Tips.
IMG Source: shopify.com
Common 3D Printer Troubleshooting Issues
Troubleshooting 3D printer issues can be both challenging and rewarding. Let’s dive into some common problems and their solutions:
First Layer Issues:
The first layer is crucial for proper adhesion to the build plate. Common problems include:
Nozzle too close to the bed: Signs of this issue include a thin printed line (sometimes transparent), excess filament squished upwards at the edges, and torn filament when the next neighboring line is printed. Adjust the nozzle height to ensure proper adhesion.
Print Not Sticking To The Bed: If your print isn’t adhering well, check bed leveling, surface cleanliness, and temperature settings.
Prints Sticking Too Much: If the print sticks too well, consider using a release agent or adjusting bed temperature.
Warping:
Warping occurs when the edges of your print lift off the bed during cooling. Solutions include using a heated bed, proper bed adhesion, and adjusting cooling settings.
Inconsistent Extrusion:
Under Extrusion: Insufficient filament flow results in gaps and weak layers. Check for clogs, filament tension, and extruder calibration.
Over Extrusion: Excessive filament flow leads to bulging layers. Adjust flow rate and check for obstructions.
Filament Issues:
Clogged Nozzle: Clean the nozzle using a needle or cold pull method.
Stringing and Oozing: Adjust retraction settings to minimize stringing.
Other Blockages: Inspect the filament path for obstructions.
Layer Quality Issues:
Elephant’s Foot: Flattened bottom layers due to excessive heat. Adjust temperature and cooling.
Cracking or Layer Separation: Check filament quality and print speed.
Weak or Under-Extruded Infill: Adjust infill density and check extrusion.
Deformed Infill: Overheating or incorrect settings can cause this.
Other Issues:
Poor Surface Quality: Check layer height, print speed, and cooling.
Temperature Variations: Maintain consistent temperature throughout the print.
Dimensional Accuracy: Calibrate steps/mm and check belt tension.
Poor Bridging: Optimize bridging settings.
Burnt Stuff Dripping On Your Print: Address overheating issues.
For more detailed information and visual examples, you can refer to comprehensive guides available online.
IMG Source: all3dp.com
In conclusion, the Anycubic Kobra 2 Neo Extruder stands out as a game-changer in the realm of 3D printing. Offering high-speed printing, linear propulsion, and dual-gear extrusion, this printer merges functionality with ease of use. Its durable metal construction ensures longevity, while its affordable price makes it accessible to a wide range of users.
By following proper installation, maintenance, and troubleshooting techniques, you can optimize the performance of your Anycubic Kobra 2 Neo Extruder and unlock its full potential. Dive into the world of 3D printing with confidence, knowing that the Anycubic Kobra 2 Neo Extruder is by your side, ready to bring your creations to life.