Are you looking to enhance the performance of your Raise3D Pro 3 3D printer? One crucial maintenance task you may need to undertake is replacing the pulleys. Proper maintenance ensures smooth and accurate 3D printing results, and understanding the process is key to keeping your printer in optimal condition.
Learn the essential steps involved in replacing the pulleys on your Raise3D Pro 3 model for seamless operation and improved print quality.
Replacing Pulleys on Raise3D Pro 3 3D Printer
If you need to replace the pulleys on your Raise3D Pro 3 3D printer, here are the steps you can follow:
Loosen the Retaining Screws in Pulleys:
Use a suitable tool (such as a hex wrench) to loosen the retaining screws in the pulleys until they can move freely.
Loosen the Belt Block Screws:
Next, loosen the screws that hold the belt block in place until you can split it from the sliding block.
Remove the Belt:
Carefully remove the existing belt from the printer.
Install the New Belt:
Place the new belt onto the rod.
Wrap the belt around the pulleys on both sides.
Remember to follow the specific instructions provided by Raise3D for your Pro 3 model. If you need further assistance or have any other questions, feel free to consult the official Raise3D Support Center.
Additionally, you can explore Raise3D’s spare parts and accessories for your printer. They offer high-quality 3D printing components to help you maintain and service your machine.
Pulley Inspection
To check for pulley wear and tear on your Raise3D Pro 3 printer, follow these steps:
Daily Maintenance:
Ensure the following conditions before starting any repair or maintenance work:
The printing task is complete.
Filaments have been unloaded from the printer.
The printer is off, and the extruders, nozzles, and build plate are at room temperature.
Always wear protective glasses and safety gloves.
Perform the following checks:
Build Plate: Clean the build plate. Refer to the resource on how to clean it.
Interchangeable Hotend: Install and disassemble the interchangeable hot end.
Loosen the retaining screws in the pulleys until they can move freely.
Loosen the screws that hold the belt block until you can split it from the sliding block.
Remove the belt from the printer.
Inspect the pulleys for signs of wear, damage, or misalignment.
If necessary, replace the belt with a new one.
Remember that regular printer maintenance is essential for consistently high-quality 3D printing results and keeping your printer in good condition. If you encounter any issues, consider contacting Raise3D after-sales support
IMG Source: zoho.com.au
Essential Pulley Replacement Guide for Your Raise3D Pro 3 Printer
Replacing pulleys in your Raise3D Pro 3 printer is an essential maintenance task to ensure smooth and accurate 3D printing. Here’s a step-by-step guide to help you through the process:
Safety First:
Turn off the printer and unplug it from the power source.
Wait for all moving parts to come to a complete stop.
Access the Pulleys:
Remove the printer’s top cover or any other panels necessary to access the pulleys.
Locate the pulleys on the X, Y, and Z axes.
Identify the Faulty Pulley:
Inspect each pulley for signs of wear, damage, or misalignment.
Check if any pulley is loose or wobbly.
Loosen the Belt:
Release tension on the belt connected to the pulley you want to replace.
Loosen the belt tensioner or adjust the belt attachment points.
Remove the Old Pulley:
Use an appropriate tool (such as an Allen wrench) to remove the set screw securing the pulley to the motor shaft.
Slide the pulley off the shaft.
Install the New Pulley:
Slide the new pulley onto the motor shaft.
Tighten the set screw to secure it in place. Ensure it’s aligned properly.
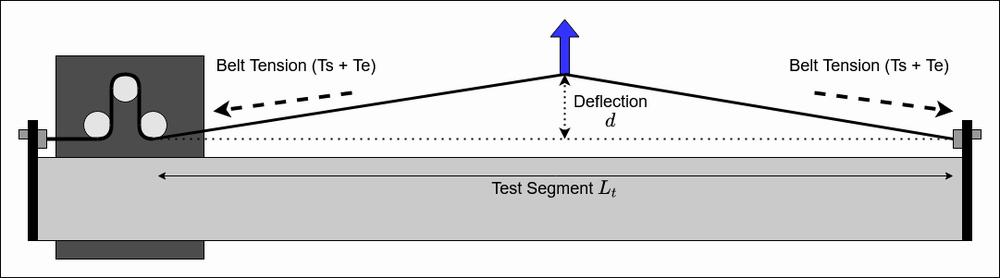
Adjust Belt Tension:
Reattach the belt to the pulley.
Adjust the belt tension to the manufacturer’s specifications.
Check that the belt is properly aligned on all pulleys.
Test the Movement:
Manually move the printer’s carriage along each axis to verify smooth motion.
Listen for any unusual sounds or vibrations.
Calibrate and Test Print:
Run a calibration routine to ensure accurate positioning.
Perform a test print to verify that the pulley replacement was successful.
Final Check:
Inspect all pulleys again to make sure they are secure and aligned.
Reassemble any panels or covers you removed earlier.
Remember to consult your Raise3D Pro 3 user manual for specific details related to your printer model. If you encounter any difficulties during the process, don’t hesitate to seek professional assistance or reach out to Raise3D support
IMG Source: ytimg.com
Factors to Consider When Selecting Pulleys for Raise3D Pro 3 3D Printer
When selecting pulleys for your Raise3D Pro 3 printer, consider the following factors to ensure optimal performance:
Material and Durability: Choose pulleys made from robust materials such as aluminum or steel. These materials withstand wear and tear, ensuring longevity.
Tooth Profile: Pulleys typically have either GT2 or HTD tooth profiles. GT2 (2 mm pitch) is common for 3D printers and works well with GT2 belts. HTD (5 mm pitch) is another option, but ensure compatibility with your printer’s belt type.
Teeth Count: The number of teeth on the pulley affects precision. More teeth provide finer resolution. For 3D printers, 16-tooth or 20-tooth pulleys are commonly used.
Bore Size: Ensure the pulley’s bore size matches your printer’s motor shaft diameter. Common sizes include 5 mm and 8 mm.
Flanges: Pulleys with flanges prevent the belt from slipping off during operation. Consider using flanged pulleys for added security.
Quality: Invest in high-quality pulleys to minimize backlash and ensure smooth motion.
Remember to consult your Raise3D Pro 3 user manual for specific recommendations and guidelines
IMG Source: media-amazon.com
Recalibration Steps
When you’ve replaced the pulley on your Raise3D Pro 3 printer, recalibrating is essential to ensure accurate printing. Here are the steps you should follow:
Offset Calibration:
Click the gear icon in the top right corner of the interface.
Select “Maintenance” under the “Machine” tab.
Choose “Offset Calibration” to recalibrate the left hot end and XY offsets for the printer.
Filament Insertion:
You’ll need to insert filament after the pulley replacement.
Currently, it’s recommended to use Raise3D Premium PLA for calibration purposes.
If you don’t typically use PLA, consider keeping some in stock specifically for calibration.
Future Improvements:
The suggestion to allow calibration prints with different filament types has been forwarded to the development team.
Hopefully, in the near future, you won’t be limited to PLA for calibration, and adjustments to filament and bed temperatures will be possible before calibration.
IMG Source: carbide3d.com
In conclusion, maintaining the pulleys on your Raise3D Pro 3 printer is essential for ensuring precision and reliability in your 3D prints. By following the step-by-step guide provided, you can confidently undertake the pulley replacement process with ease. Remember to prioritize safety, consult the official Raise3D resources for specific instructions, and reach out to Raise3D Support if you encounter any challenges.
With proper maintenance and quality pulley replacements, your Raise3D Pro 3 printer will continue to deliver exceptional printing results. Keep your printer running smoothly by staying proactive with pulley replacements and regular maintenance.