Are you looking to enhance the performance of your Creality Ender 7 hotend? Dive into this detailed guide that outlines essential tips and information to optimize your 3D printing experience. From replacement kits to maintenance practices, we’ve got you covered with all you need to know about maximizing the capabilities of your Creality Ender 7 hotend.
Hot End Options for Creality Ender 7
The Creality Ender 7 is a popular 3D printer model known for its reliability and versatility. Let’s delve into some information related to its hotend:
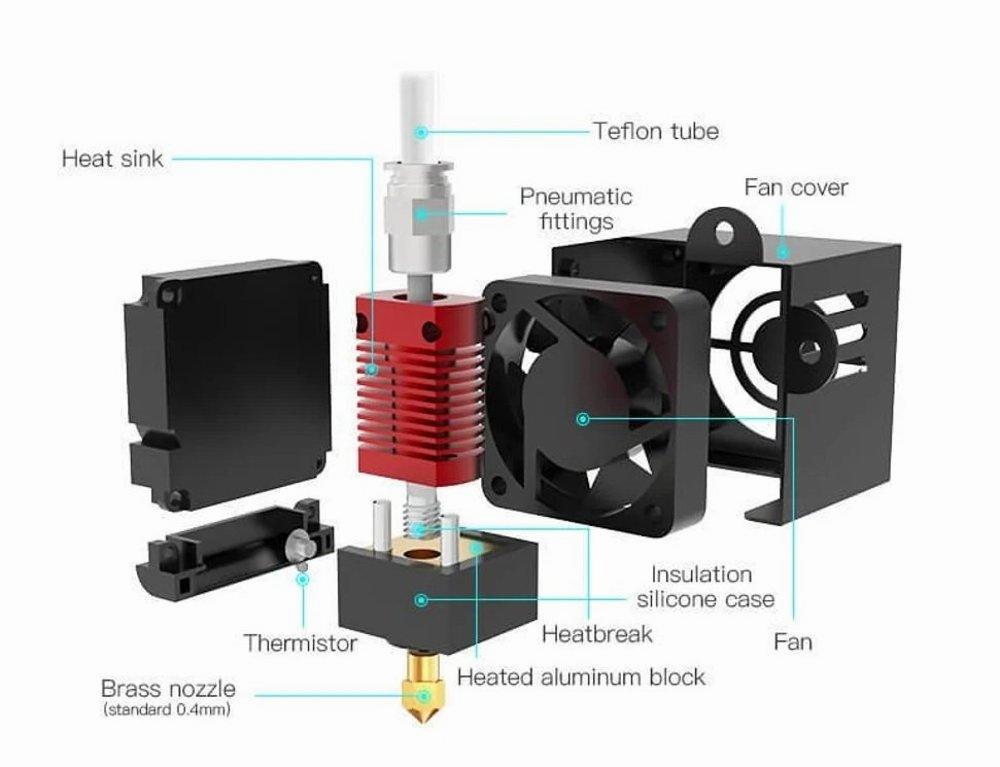
Replacement Hot End Kit:
If you need to replace your existing hot end or want to upgrade your 3D printer, consider the Creality 3D Ender 7 Replacement Hot End Kit. This kit includes:
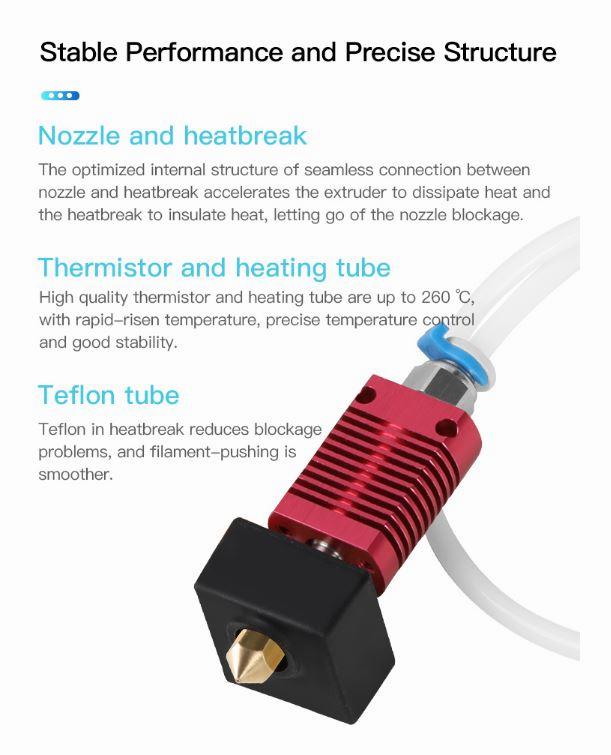
A high-performance hot end.
A nozzle.
A heating block.
A fan.
The hot end is designed to provide reliable and consistent performance, with a temperature range of up to 250°C.
Spider PRO Hot End:
Creality has also released the “Spider” PRO hot end, which is an upgrade option for the Ender 7.
The Spider PRO hot end is advertised as having a higher capacity and flow rate compared to the standard Ender 7 hot end.
Various tests suggest that the Spider PRO hot end can support a volumetric flow rate of nearly 24 mm^3/s.
Creality Spider Hotend Upgrade:
Another upgrade option is the Creality Spider Hotend.
It offers high-temperature capabilities and improved printing speed.
If you’re looking for enhanced performance, this could be a great choice.
Creality Ender 7 Hotend Features
Let’s delve into the features of the Creality Ender 7 hotend. This printer has garnered attention for its speed and performance. Here’s what you need to know:
Core-XY Structure: The Ender 7 employs a Core-XY structure, which utilizes dual motors running in parallel for coordinated operations. This design results in faster printing speeds and higher precision.
High-Speed Cooling Fans: The Ender 7 features a unique butterfly-shaped wing ducted cooling fan that draws in 169% more air compared to previous models. This enhanced cooling ensures optimal print quality. Additionally, the customized nozzle can hold up to 50mm of filament inside its melt zone, allowing for smooth feeding even at high printing speeds.
Temperature Capabilities: The Ender 7 is capable of reaching a hot-end temperature of 260°C and a build plate temperature of 100°C. This versatility allows it to work with a wide range of filaments, from standard PLA to more specialized materials.
While the Ender 7 prioritizes speed, it’s essential to consider other factors such as build volume, ease of use, and overall reliability when evaluating 3D printers. For a comprehensive review, you can check out the detailed assessment on All3DP
IMG Source: squarespace-cdn.com
How to Install a Hotend on Creality Ender 7 Printer
Installing a hotend on your Creality Ender 7 printer is an essential task for maintaining optimal performance. Let’s walk through the process step by step:
Prepare Your Workspace:
Ensure you have a clean, well-lit area to work in.
Gather the necessary tools, including a screwdriver, pliers, and any replacement parts.
Safety First:
Turn off your printer and unplug it from the power source.
Allow the hotend to cool down completely before proceeding.
Remove the Old Hotend:
If you’re replacing an existing hotend, carefully detach it from the printer.
Disconnect any wires or cables connected to the old hotend.
Assemble the New Hotend:
Follow the manufacturer’s instructions for assembling the new hotend.
Pay attention to the wiring and ensure proper connections.
Mount the New Hotend:
Attach the new hotend to the printer carriage.
Secure it in place using the provided screws.
Connect the Wires:
Reconnect any wires or cables to the new hotend.
Double-check that the connections are secure.
Calibration and Testing:
Power on your printer and run a test print.
Monitor the hotend temperature and ensure it reaches the desired level.
Adjust any settings as needed.
Final Checks:
Inspect the hotend for any leaks or loose components.
Confirm that the filament feed path is clear and properly aligned.
For more detailed guidance, you can refer to the Creality Ender 7 hotend replacement tutorial on the Creality After-sale YouTube channel. Remember that this channel provides tutorial references for solving various printer problems but does not handle technical Q&A. If you encounter any after-sales issues, you can directly email their customer support at [email protected].
IMG Source: 3dprinteraccessories.shop
Hotend Maintenance Best Practices
Proper hotend maintenance is essential for optimal 3D printer performance. Let’s delve into some best practices:
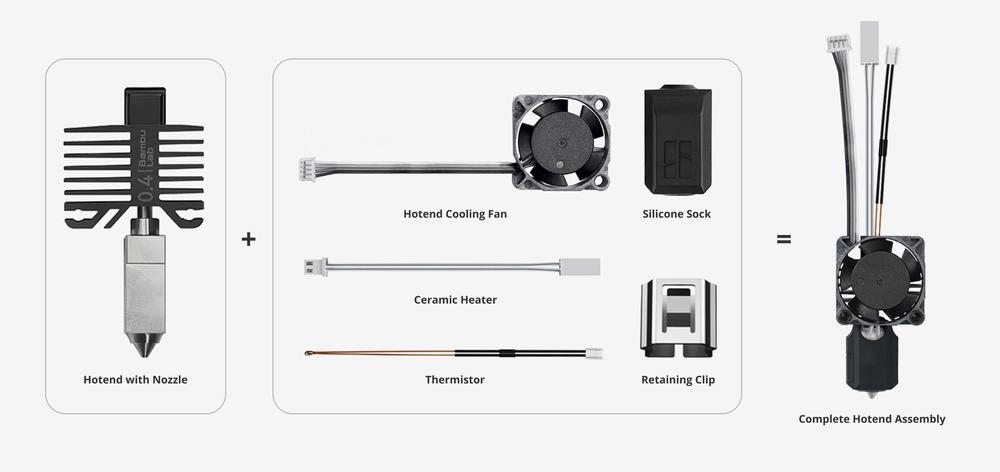
The nozzle is a critical component of the hotend. It must be cleaned both on the outer surfaces and inside the nozzle aperture.
Regular cleaning prevents clogs and ensures smooth filament flow.
Inspect and Replace Worn Nozzles:
Over time, nozzles can wear out due to constant heating and cooling cycles.
Inspect them periodically and replace any worn or damaged nozzles promptly.
Check the Heat Block and Heat Break:
The heat block and heat break play crucial roles in maintaining consistent temperature control.
Inspect them for any signs of damage, such as cracks or warping.
Monitor Thermistor Functionality:
The thermistor provides temperature feedback for precise control.
Regularly check its functionality to ensure accurate temperature readings.
Keep the Filament Guide Clear:
Ensure that the filament guide remains unobstructed.
Any debris or buildup can affect filament movement.
Inspect the Cooling Fan:
The cooling fan prevents heat creep and ensures efficient cooling.
Verify that it’s functioning properly and clean it if necessary.
Consider All-Metal vs. Hybrid Hotends:
Hotends are available in all-metal assemblies or metal-plastic hybrids.
Choose based on your printing needs and material compatibility.
IMG Source: bambulab.com
Optimizing Creality Ender 7 Hotend
Optimizing your Creality Ender 7 hotend for better print quality involves several considerations. Let’s explore some steps you can take:
Temperature Settings:
Ensure that your hotend temperature is calibrated correctly. Different filaments require different temperatures. Experiment with temperature settings to find the sweet spot for your specific filament.
Use a reliable temperature sensor to accurately measure the hotend temperature.
Nozzle and Layer Height:
Use a high-quality nozzle. A worn-out or damaged nozzle can negatively impact print quality.
Adjust the layer height. Smaller layer heights (e.g., 0.1mm) generally result in smoother surfaces.
Filament Quality and Dryness:
Use good-quality filament. Moisture-absorbed or poor-quality filament can lead to inconsistent extrusion and poor prints.
Store filament in a dry environment to prevent moisture absorption.
Belt Tension and Bed Leveling:
Ensure that the belts are properly tensioned. Loose belts can cause layer misalignment.
Regularly level the print bed to maintain consistent first-layer adhesion.
Print Speed and Acceleration:
While the Ender 7 is rated for high speeds, consider starting with moderate speeds (e.g., 50-60mm/s) and gradually increase if the quality remains good.
Pay attention to acceleration settings. High acceleration can affect print quality.
Cooling Fan and Overhangs:
Optimize cooling fan settings. Proper cooling prevents overheating and improves overhangs.
Print overhangs at a slower speed to maintain quality.
Calibration Cube and Fine-Tuning:
Print a calibration cube to assess dimensional accuracy and layer bonding.
Fine-tune settings such as retraction distance, flow rate, and print speed based on the cube’s results.
For more detailed information, consider checking community forums and resources specific to the Ender 7. Additionally, if you’re experiencing sudden quality changes, review general troubleshooting tips for 3D printers.
IMG Source: 3dprintshoppy.com
In conclusion, taking care of your Creality Ender 7 Hotend is crucial for maintaining top-notch 3D printing quality. By following the recommended maintenance practices, optimizing settings, and staying informed about upgrades, you can ensure that your hotend continues to deliver exceptional results for your printing projects. Remember, a well-maintained hotend not only improves print quality but also extends the lifespan of your 3D printer.
Stay proactive, stay informed, and make the most of your Creality Ender 7 Hotend for all your future printing endeavors.