Are you looking to enhance the performance of your Creality Ender-3 V3 SE 3D printer with the right kind of nozzle? The Creality Spider nozzles are specifically designed for this model, ensuring optimal printing quality and compatibility. In this guide, we will walk you through the process of replacing the nozzle and explore the benefits of upgrading to a Creality Spider nozzle for your Ender-3 V3 SE.
The Creality Ender-3 V3 SE 3D printer uses a specific type of nozzle. Unlike previous models that utilized MK8-style nozzles, the Ender-3 V3 SE now employs Creality Spider nozzles. These nozzles are proprietary and not compatible with other standard nozzles or hotends.
If you need to replace the nozzle on your Ender-3 V3 SE, here are some steps you can follow:
Needle Cleaning: Before replacing the nozzle, it’s a good idea to clean it. You can use a needle or nozzle cleaning tool to remove any clogs or debris that might affect printing quality. There’s a helpful tutorial video on Creality’s official YouTube channel that demonstrates needle cleaning and nozzle replacement.
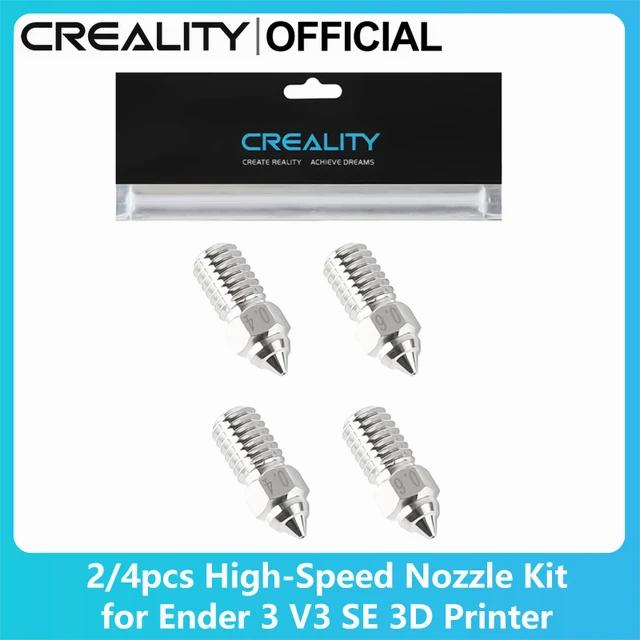
Nozzle Replacement: If you need to replace the nozzle, make sure to get a compatible Creality Spider nozzle. These are specifically designed for the Ender-3 V3 SE. You can find replacement nozzles through Creality’s official channels. Remember to attach your machine type and accessories pictures when contacting Creality for assistance.
High-End Hardened Steel Nozzle Kit: Creality also offers a High-End Hardened Steel Nozzle Kit that you might consider. It’s designed for durability and improved performance. You can explore this option if you’re looking for an upgrade.
The Creality Ender-3 V3 SE is part of the Flagship Series in Creality’s 3D printer lineup. Let’s explore the specifications related to its nozzle:
Nozzle Type: The Ender-3 V3 SE no longer uses the MK8-style nozzles that previous models used. Instead, it now employs Creality Spider nozzles. These nozzles are proprietary and not compatible with other nozzles or hotends.
Auto Leveling: The printer features auto leveling, making it easy to get started with worry-free printing.
Printing Potential: With the Ender-3 V3 SE, you can unlock your creative potential. It offers an intuitive touch UI with a responsive tab bar, real-time model preview, and vivid motion graphics of printing parameters.
IMG Source: alicdn.com
The Creality Ender-3 V3 SE is an impressive 3D printer with several notable features. Let’s explore the benefits of upgrading the nozzle:
Improved Heat Creep Resistance: The integrated bimetallic heartbreak in the upgraded nozzle helps reduce heat creep during printing. This means better temperature stability and consistent extrusion, especially during longer prints.
Versatility: The Ender-3 V3 SE follows the Cartesian design principle and boasts a maximum hot-end temperature of 260°C. This versatility allows it to work with various filaments, including PLA, PETG, and TPU.
Faster Print Times: If you choose to upgrade to a larger nozzle, such as a 0.6mm, your print times should be significantly faster. The printer is already quite speedy with the stock 0.4mm nozzle, but the larger nozzle can further enhance efficiency.
IMG Source: staticdj.com
Installing a V3 SE nozzle on your Creality Ender-3 3D printer is a straightforward process. Here are the steps you can follow:
Preparation:
Remove the Existing Nozzle:
Clean the Hotend:
Install the V3 SE Nozzle:
Level the Bed:
Calibration and Test Print:
Remember to follow safety precautions
For more detailed visual instructions, you can also refer to this YouTube tutorial by Creality After-sale.
IMG Source: media-amazon.com
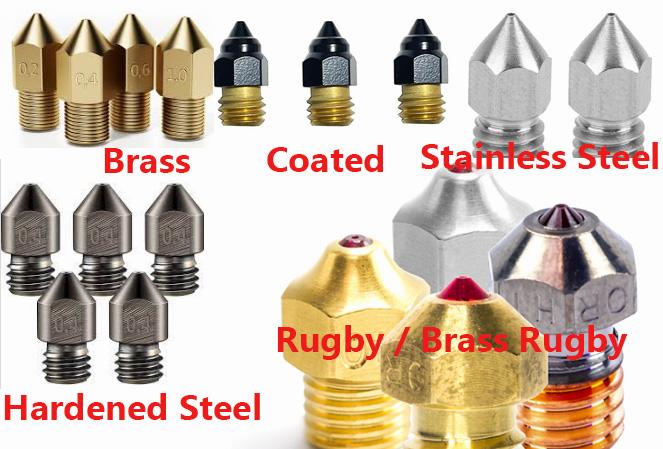
Let’s delve into the world of 3D printer nozzles. These tiny components play a significant role in shaping the quality of your prints, print speed, and filament compatibility. Here’s a comparison of some of the best 3D printer nozzles:
Brass Nozzles:
Stainless Steel & Hardened Steel Nozzles:
Ruby-Tipped Nozzles (Olsson Ruby):
For more detailed information, check out the full buyer’s guide on 3DSourced.
IMG Source: geekbuying.com
By following the steps outlined in this guide, you can effectively install a V3 SE nozzle on your printer and enjoy the enhanced performance it brings. Explore the possibilities of upgrading your Creality Ender-3 V3 SE with a new nozzle today.