Are you tired of the noise coming from your Creality Ender 3 S1 Pro cooling fans? Upgrading the fans can not only reduce the noise but also improve the overall performance of your 3D printer. In this comprehensive guide, we will explore various fan upgrade options and step-by-step instructions for replacing the fans to enhance your printing experience.
Upgrading Cooling Fans for Creality Ender 3 S1 Pro
If you’re experiencing noise issues with your Creality Ender 3 S1 Pro, upgrading the cooling fans might be the solution. Let’s explore some options:
Silent Fan Upgrades:
If noise is bothering you, consider replacing the stock fans with quieter alternatives. Quieter fans can significantly reduce the overall noise level of your printer.
Check out this article on All3DP for a list of recommended fan upgrades for the Ender 3 (V2/Pro/S1).
Hotend Fan Replacement:
If your hotend fan isn’t working properly, it’s essential to replace it promptly. You can find tutorials and videos online that demonstrate how to replace the hotend fan on your Ender 3 and other similar printers.
Voltage Considerations:
When selecting replacement fans, ensure they match the voltage requirements of your printer.
The Ender 3 typically uses 24V fans. If you’re replacing them, get either 24V fans or a 12V fan with a buck converter to adjust the voltage from 24V to 12V.
Available Cooling Fans:
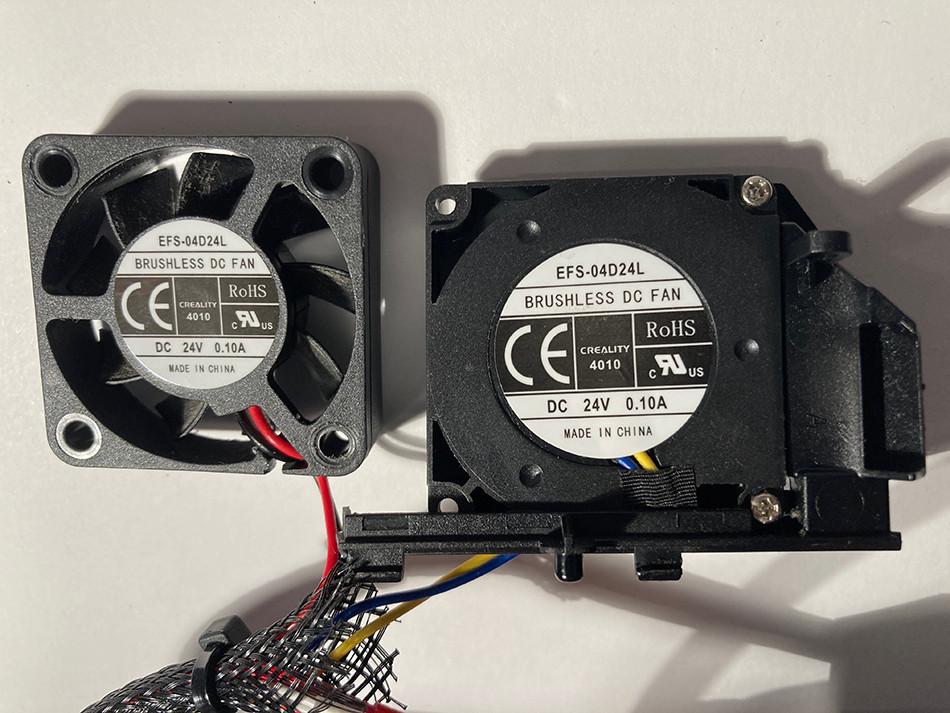
Creality offers specific cooling fans for the Ender-3 S1:
4010 Blower Fan: Designed for cooling the extruder hot end.
3010 Blower Fan: Another cooling fan option for the printer.
These fans help maintain optimal temperatures during printing and prevent overheating.
Official Creality Cooling Fan Kit:
For high-speed printing and efficient heat dissipation, consider the Official Creality Cooling Fan Kit.
It includes adjustable auxiliary fans for the extruder hot end and is compatible with various Creality models, including the Ender 3/Pro/V2/Neo/S1/CR-6 SE.
Features of Creality Ender 3 S1 Pro
The Creality Ender 3 S1 Pro is an upgraded version of the popular Ender 3 series, offering enhanced features for high-temperature printing. Let’s delve into the cooling system components and other notable aspects:
Water Cooling Kit:
The Ender 3 S1 Pro comes equipped with a water cooling kit designed for high-temperature 3D printing. This kit is compatible with other FDM printers equipped with the Sprite Extruder Pro.
Function: Rapidly cools down the hotend, effectively preventing clogging during high-temperature extrusion.
Ender-3 S1 Pro Features:
The Ender-3 S1 Pro boasts several improvements over its predecessor:
Direct Drive Extrusion System: Unlike side-mounted bowden extruders, the direct drive system is more reliable and requires less maintenance.
Updated Touch Screen: The printer includes an improved touch screen interface for easier navigation.
Built-in LED Light Bar: Enhances visibility during printing tasks.
Laser Engraving Option:
The Ender-3 S1 Pro offers users a choice between two features:
Liquid Cooling Heatsink: Ideal for high-temperature printing.
Laser Engraving Module: Allows customization with favorite images.
IMG Source: smith3d.com
Benefits of Upgrading Cooling Fans on Ender 3 S1 Pro
Upgrading the cooling fans on your Ender 3 S1 Pro can have several benefits. Let’s explore them:
Reduced Noise: Replacing the stock fans with quieter alternatives can significantly reduce the noise generated during printing. Quieter fans contribute to a more pleasant working environment and prevent disturbances.
Improved Cooling: Upgraded fans can enhance the cooling efficiency of your printer. Proper cooling is crucial for maintaining consistent print quality, especially during long or complex prints. Better cooling helps prevent overheating and warping of printed layers.
Enhanced Print Quality: Efficient cooling ensures that each layer of filament solidifies properly. This results in cleaner, smoother surfaces and reduces the chances of defects like stringing or layer misalignment.
Now, let’s dive into the specifics:
The Ender 3 S1 Pro has four main fans:
Part Cooling Fan: This fan cools the printed layers as they are deposited. Upgrading this fan can significantly impact print quality.
Hotend Fan: The hotend fan keeps the extruder assembly cool. Replacing it with a quieter fan can improve overall noise levels.
Mainboard Fan: The mainboard fan prevents the electronics from overheating. Consider upgrading it for better cooling efficiency.
Power Supply Fan: The power supply fan ensures stable operation. Upgrading it can contribute to system reliability.
Recommended Fan Upgrades:
Noctua NF-A4x10 and Noctua NF-A4x20: These premium-quality, near-quiet fans are excellent choices for part cooling and hotend applications.
Noiseblocker Black Silent 40 x 10 mm: Known for reliability and ultra-silent operation.
Orion OD4010-24HB: Louder than Noctua or Noiseblocker fans but offers better airflow.
Installation Tips:
Be cautious when working with the power supply and mainboard.
If using 12V fans, consider using a buck converter.
Print a suitable duct or shroud for the part cooling fan.
Remember, the right fan choice depends on your priorities—whether you prioritize cooling power or noise reduction. For a balanced upgrade, consider replacing the stock hotend fan with a quieter 40 x 20 mm fan like the Sunon MF40202V2-1000U-A99. It strikes a good balance between airflow and noise reduction.
For more detailed information, you can refer to the source.
IMG Source: all3dp.com
Practical Maintenance: Fan Replacement for Creality Ender 3 S1 Pro
Replacing the cooling fans on your Creality Ender 3 S1 Pro is a practical maintenance task that can improve performance and extend the lifespan of your printer. Here are the steps to replace the fans:
Hot End Fan Replacement:
Tools Needed: You’ll require a Phillips head screwdriver, a T10 Torx driver, and a pair of pliers.
Locate the screws that hold the hot end fan in place:
The top screws are hidden under the shroud.
The bottom screws are at the back of the printer.
Carefully remove the old fan by unscrewing these screws.
Install the new fan in the same position, securing it with the screws.
If you want to make future replacements easier, consider installing JST-SM connectors. This way, you can unplug the old fan and plug in the new one without disassembling the entire setup.
Parts Cooling Blower Fan Replacement:
Follow similar steps for the parts cooling blower fan:
Locate and remove the screws holding the old fan.
Install the new fan in its place.
Consider using JST-SM connectors here as well for convenience.
Additional Tips:
Zener diodes: Some users recommend adding cheap Zener diodes to protect the fans from voltage spikes.
Micro JST connectors: These connectors make future replacements even easier.
Soldering iron: If you need to solder wires, ensure you have a soldering iron handy.
Quality Fans: Consider investing in quality fans for better performance and longevity.
If you’d like visual guidance, there’s a helpful video tutorial on YouTube that demonstrates fan replacement for the Ender 3. Additionally, the Creality Lovers website provides detailed instructions for fan replacement. Feel free to explore these resources for more in-depth information.
IMG Source: imgur.com
Tips for Maintaining 3D Printer Cooling Fans
Maintaining your 3D printer cooling fans is essential for optimal performance and print quality. Here are some tips to keep your fans in good shape:
Regular Cleaning:
Dust and debris can accumulate on the fan blades over time, reducing their effectiveness.
Use compressed air or a soft brush to clean the fans periodically.
Avoid touching the blades with your fingers, as the oils from your skin can affect performance.
Check Fan Connections:
Ensure that the fan connectors are securely attached to the control board.
Loose connections can lead to fan malfunctions.
Inspect Fan Blades:
Look for any signs of damage or wear on the blades.
If you notice cracks or bends, consider replacing the fan.
Monitor Fan Speed:
Adjust the fan speed settings in your slicer software.
For most 3D printing materials, it’s recommended to turn off the fan for the first layer or two to prevent warping.
Gradually increase the fan speed as the print progresses.
Remember that proper cooling is crucial for achieving high-quality prints, especially when using materials like PLA
IMG Source: shopify.com
In conclusion, maintaining and upgrading the cooling fans on your Creality Ender 3 S1 Pro is essential for achieving optimal print quality and performance. By investing in silent fan upgrades, ensuring proper voltage considerations, and exploring available cooling fan options, you can significantly enhance your 3D printing experience. Remember to regularly clean and inspect your fans to prevent issues and consider quality replacements for long-term reliability.
Take the necessary steps to keep your Creality Ender 3 S1 Pro cooling fans in good shape and enjoy smoother, quieter, and more efficient 3D printing sessions.