Welcome to the world of 3D printing with the Bambu Lab P1S Display Panel. As a crucial component for your 3D printer, this display panel not only showcases printing parameters but also puts control at your fingertips. From LCD screen clarity to physical button efficiency, this panel is tailored to enhance your printing experience.
Let’s dive into its applications and features to uncover the true potential of the Bambu Lab P1S Display Panel.
Bambu Lab P1 Series Screen Details
The Bambu Lab P1 Series Screen is a crucial component for displaying printing parameters and controlling the printer. Here are some details about it:
LCD Type: FSTN/NEGATIVE/TRANSMISSIVE
Module Power Consumption: 2.45mW at 3.3V
Recommended Viewing Direction: 12:00
Backlight Type: LED
Viewing Area (W*H): 67.6 mm * 23.19 mm
Active Area (W*H): 66.6 mm * 22.19 mm
Operating Temperature: -20°C to 70°C
Humidity: 90%RH max @ (60°C max)
Number of Dots: 192 * 64
Contrast Ratio: Cr = 50
Typical Luminance Uniformity: 70% minimum
Surface Luminance: 80 cd/m² typical
Typical Viewing Angle Range: 35°
Color: Grey
Package Size: 145 mm * 100 mm * 55 mm
Package Weight: 900 g
The P1 Series Screen is compatible exclusively with the P1 Series printers. If you need to replace this screen, you can find detailed installation instructions on the Bambu Lab Wiki.
Additionally, if you require other replacement parts, consider the following:
Rear Metal Panel: This black metal panel is installed on the back of the P1S printer. Please use the original screws from the printer for installation, as they are not included in the package.
Right Plastic Panel: Installed on the right side of the printer when facing the screen, this plastic panel can also be replaced. Refer to the Bambu Lab Wiki for installation guidance.
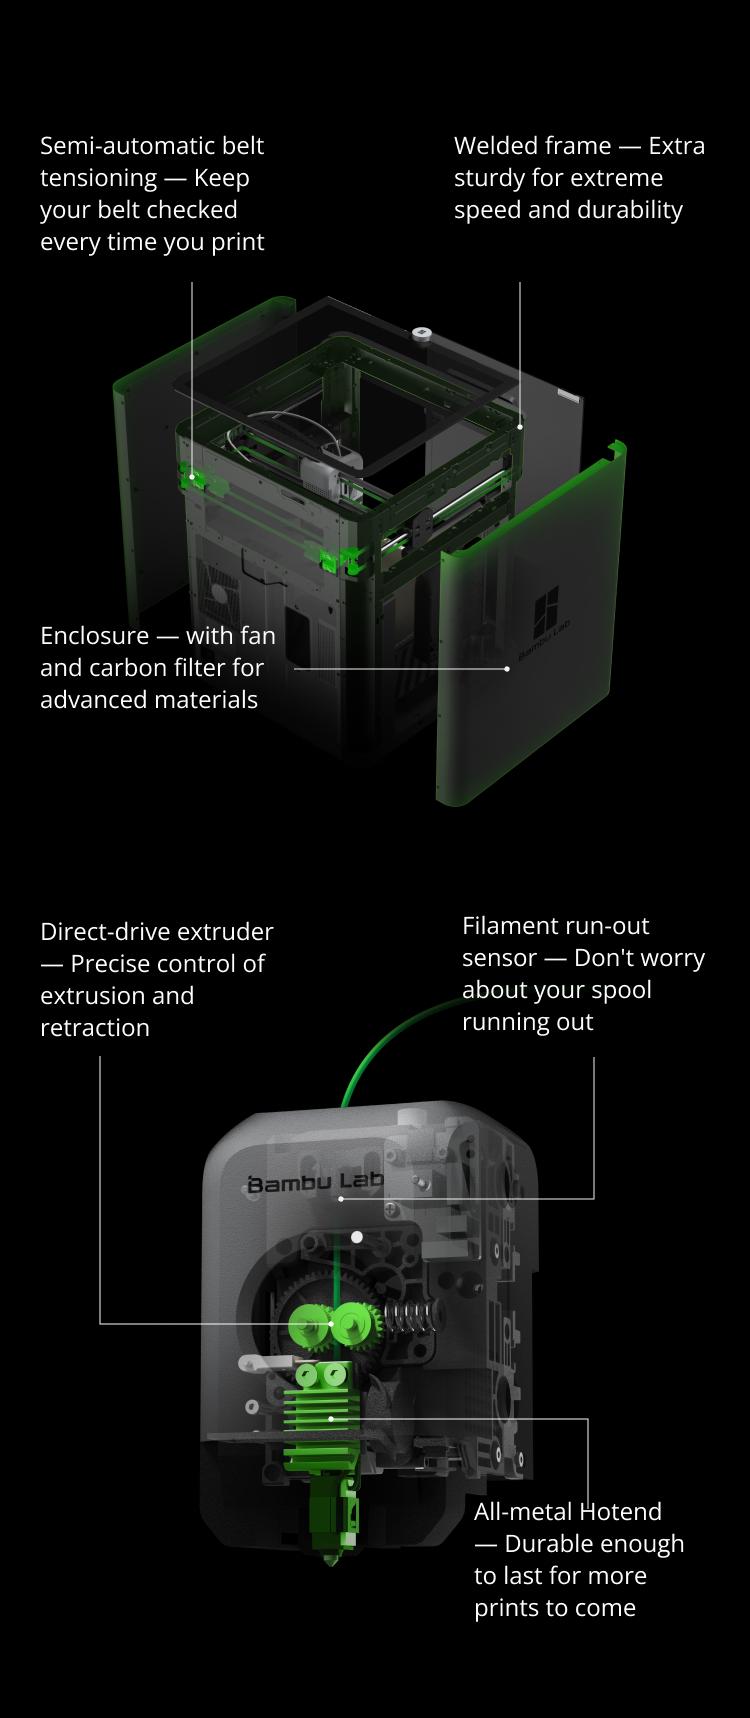
Key Features of Bambu Lab P1S 3D Printer
Let’s explore the features and specifications of the Bambu Lab P1S 3D Printer:
Easy Setup: The P1S printer is designed to be user-friendly and can be set up in just 15 minutes.
Well-Polished Hardware and Software: You’ll find the hardware and software of the P1S to be meticulously crafted for optimal performance.
Enclosed Body: The printer features an enclosed body, making it suitable for high-temperature filament printing.
AMS Technology for Color Printing: With the AMS (Advanced Multi-color System), the P1S supports up to 16-color printing.
Impressive Acceleration: It boasts an acceleration of up to 20,000 mm/s², allowing it to print a Benchy (a popular 3D printing benchmark) in just 18 minutes.
Built-in Camera: The P1S comes equipped with a built-in camera for remote monitoring and creating time-lapse videos.
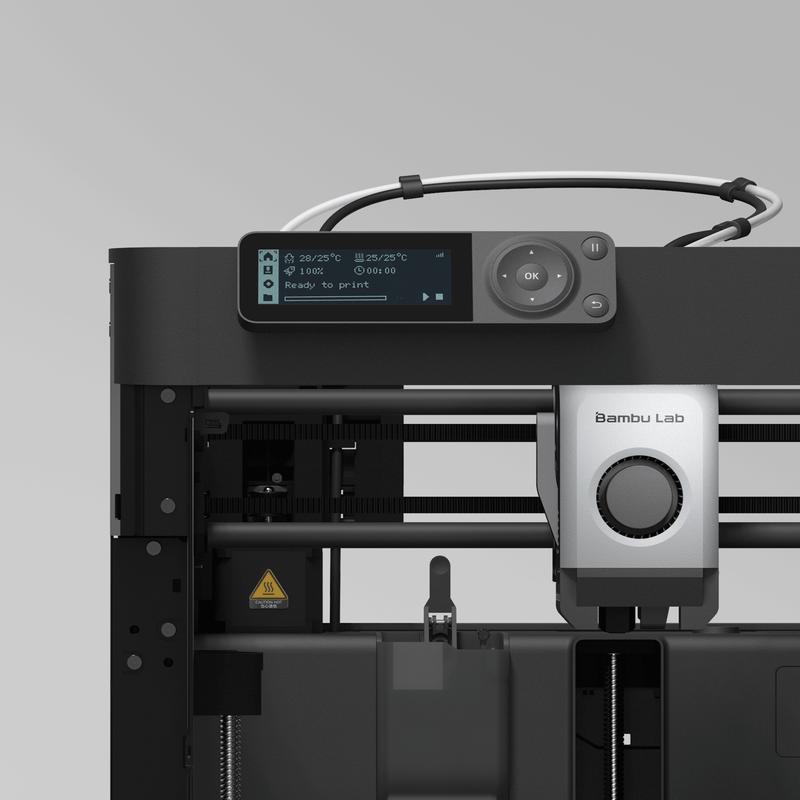
Display Panel:
The P1S features a 2.7-inch 192 x 64 screen display .
Additionally, it has Wi-Fi and Bluetooth connectivity options.
You can control it via the button interface, mobile app, or PC application.
The Bambu Lab P1S Display Panel serves as a crucial component for your 3D printer. Let’s delve into its applications and features:
Display and Control: The P1S Display Panel features an LCD screen and physical control buttons. It serves two primary purposes:
Display Printing Parameters: You can view essential printing parameters directly on the screen.
Printer Control: The physical buttons allow you to interact with and control your printer efficiently.
Compatibility: The P1S Display Panel is exclusive to the P1 Series printers. If you own a P1 printer, this display module is designed specifically for your setup.
Installation and Replacement: If you need to replace the P1 Series Screen, you can find detailed instructions on the Bambu Lab Wiki.
In addition to the display panel, Bambu Lab offers other exciting features for their P1 Series printers, including connectivity with Bambu slicing software and a mobile app for printer control and print monitoring
IMG Source: bambulab.com
Installation Guide for Bambu Lab P1S Display Panel
Here’s a quick start guide for installing the Bambu Lab P1S Display Panel. Before you begin, please review the entire guide to ensure a smooth installation process. Remember not to connect the printer to power until assembly is complete.
Component Introduction:
Air Filter
Tool Head
SD Card
Pause Screen
Back Chamber Camera
Belt Tensioner
Bambu Bus
Build Plate
Cooling Fan
Excess Chute
Power Socket
Hot Bed Unlock & Screen Installation:
Remove the three screws with an Allen Key H2 to unlock the hot bed.
Insert the screen back into the slot on the printer, ensuring the LCD cable is bent toward the opening on the back of the screen.
QR Code Setup:
Use Bambu Handy to scan the QR code on the screen.
Bind your printer with your Bambu Lab account.
Follow the instructions on the screen to complete the initial calibration.
First Print:
Select the temperature range for the nozzle.
Heat the nozzle to the desired temperature.
Manually pull out the filament from the PTFE tube anchor.
Log in to Bambu Studio using your Bambu Lab account (same as the Bambu Online store).
Create or open a project.
Slice the model, select your printer, and send the model to print.
Technical Specifications:
Build Volume: 256 x 256 x 256 mm³
Hot End: All-Metal Extruder
Nozzle Diameter (Included): 0.4 mm
Electrical Requirements: 100-240 VAC, 50/60 Hz
Display: 2.7-inch 192×64 Screen
Connectivity: Wi-Fi, Bluetooth, Bambu-Bus
IMG Source: bambulab.com
Bambu Lab P1S 3D Printer Overview
The Bambu Lab P1S is a 3D printer that has garnered attention for its impressive features and performance. Let’s dive into the details:
Overview:
The P1S is a more affordable version of the popular X1 Carbon, which introduced the masses to effortless Core XY speed in 2022.
Despite not bringing any technological improvements, the P1S caters to users’ desires: it’s a fully enclosed, easy-to-use Core XY printer that won’t break the bank.
Retailing at $699, the P1S is $500 cheaper than the deluxe X1 Carbon, which boasts additional sensors, a better screen, and a higher quality camera.
Bambu Lab also offers a P1P to P1S upgrade kit for $150, including plastic panels, a glass door, top cover plate, heavy-duty toolhead cable and chain, and cabin fans.
Key Features:
Auto Bed Leveling: The P1S boasts one of the best auto bed leveling systems.
Speed: It’s capable of 500mm/s print speeds with a blazing 20,000 mm/s acceleration speed, making it a favorite among speedsters.
Materials: The printer handles a wide range of materials, including PLA, TPU, ABS, and PC (up to 300 degrees).
Build Volume: 256 x 256 x 256 mm (10 x 10 x 10 inches).
Extruder Type: Direct drive.
Nozzle: 0.4mm proprietary.
Connectivity: microSD card, WiFi, Bluetooth.
User Interface: The UI is a low-resolution, 2.8-inch monochrome LCD controlled by a directional pad—functional but somewhat clunky.
Pros and Cons:
Pros:
Blazing speed
Enclosure for high-temperature printing
Simple auto bed leveling
Optional 4 Color AMS
Cons:
Noisy
Proprietary replacement parts
AMS unit wastes filament
Specifications:
Machine Footprint: 389 x 389 x 458 mm (15.3 x 15.3 x 18 inches).
Machine Weight: 12.95 KG (28.5 lbs).
In summary, the Bambu Lab P1S hits a sweet spot by offering affordability, speed, and access to Bambu Lab’s popular AMS system. If you’re ready to jump on the Bambu wagon, the P1S
In conclusion, the Bambu Lab P1S Display Panel stands as a cornerstone in the realm of 3D printing technology. With its seamless integration with P1 Series printers, this panel offers a user-friendly approach to displaying vital parameters and controlling your printing process. Whether you need to replace a faulty screen or upgrade your existing setup, the detailed installation instructions provided by Bambu Lab ensure a smooth transition.
Elevate your printing experience with the Bambu Lab P1S Display Panel and unlock a whole new dimension of precision and efficiency.