Ultimate Guide to Anycubic Kobra 2 Neo Stepper Motors

Ultimate Guide to Anycubic Kobra 2 Neo Stepper Motors

Welcome to our comprehensive guide on maintaining and replacing stepper motors in the Anycubic Kobra 2 Neo 3D printer. Stepper motors are vital components that ensure precise movement, making them crucial for high-quality 3D printing. In this article, we will delve into detailed steps for replacing both the X-axis and Y-axis stepper motors, highlighting essential tools and procedures.

Whether you’re a seasoned 3D printing enthusiast or a beginner, mastering the maintenance of these motors is key to keeping your Anycubic printer running smoothly and producing impressive prints.

Replace X-axis Stepper Motor on Anycubic Kobra 2 Neo 3D Printer

The Anycubic Kobra 2 Neo 3D printer relies on stepper motors to drive its moving parts, ensuring precise positioning during printing. If you encounter issues with a malfunctioning motor, follow these steps to replace the X-axis stepper motor:

  1. Safety First:

    • Unplug the power cable from your 3D printer to ensure safety.
    • Remove any filament from the extruder to prevent obstructions during the replacement process.
  2. Remove the Old Motor:

    • Use an Allen key to unscrew the secure screws distributed on the Z-axis carriage.
    • Release the belt from the motor pulley.
    • Unplug the motor cable to completely separate the motor from the X-axis.
  3. Install the New Motor:

    • Attach the new motor to the X-axis carriage using the same secure screws.
    • Fasten the belt onto the motor pulley.
    • To ensure proper printing accuracy, tighten the belt using the belt tensioner knob.
    • Plug in the motor cable to complete the installation.
  4. Test Your 3D Printer:

    • After installing the new X-axis motor, test whether it functions correctly.
    • Use the printer display to move the print head along the X-axis.
    • Verify that the movement is smooth and accurate, confirming the successful installation.

Anycubic Kobra 2 Neo 3D Printer: X-Axis Stepper Motor Replacement Guide

Let’s delve into the key features of the Anycubic Kobra 2 Neo 3D printer, with a specific focus on its stepper motors:

  1. Fast Printing Speed: The Anycubic Kobra 2 Neo boasts impressive printing speeds of up to 250mm/s. This rapid motion ensures efficient and timely printing results.

  2. Precision and Affordability: With the Kobra 2 Neo, you get a balance of precision and affordability. It’s an excellent choice for those seeking quality prints without breaking the bank.

  3. X-Axis Stepper Motor Replacement: If you ever need to replace the X-axis stepper motor, follow these steps:

    • Unplug Power and Unload Filament: First, ensure safety by unplugging the power cable from your 3D printer. Remove any filament from the extruder to prevent obstructions during the replacement process.

    • Remove Motor from X-Axis: Use an Allen key to remove the secure screws on the Z-axis carriage. Release the belt from the motor pulley and unplug the motor cable to separate the motor from the X-axis.

    • Install the New Motor: Attach the new motor to the X-axis carriage using the same screws. Fasten the belt onto the motor pulley, ensuring proper tension. Plug in the motor cable.

    • Test Your Printer: After installation, test whether the new X-axis motor functions correctly. Make the print head move along the X-axis using the printer display to verify smooth and accurate movement.

Remember that different models within the Kobra series may have varying motor configurations. For instance, some models like the Kobra Go and Kobra Neo have integrated motors and pulleys, while others have separate components. Adjust the replacement procedure accordingly based on your specific printer.

Black and blue Anycubic 3D printer with a red power button.

IMG Source: technologyoutlet.co.uk


Replace Y-Axis Stepper Motors for Anycubic Kobra Series 3D Printer

Here’s a guide on how to replace the Y-axis stepper motors for the Anycubic Kobra Series 3D Printer. Stepper motors are crucial components in a 3D printer, responsible for precise movement. If you’ve detected a damaged motor, follow these steps to replace it:

  1. Tools You’ll Need:

    • Allen keys
    • New Y-axis motor (specific to your Kobra model)
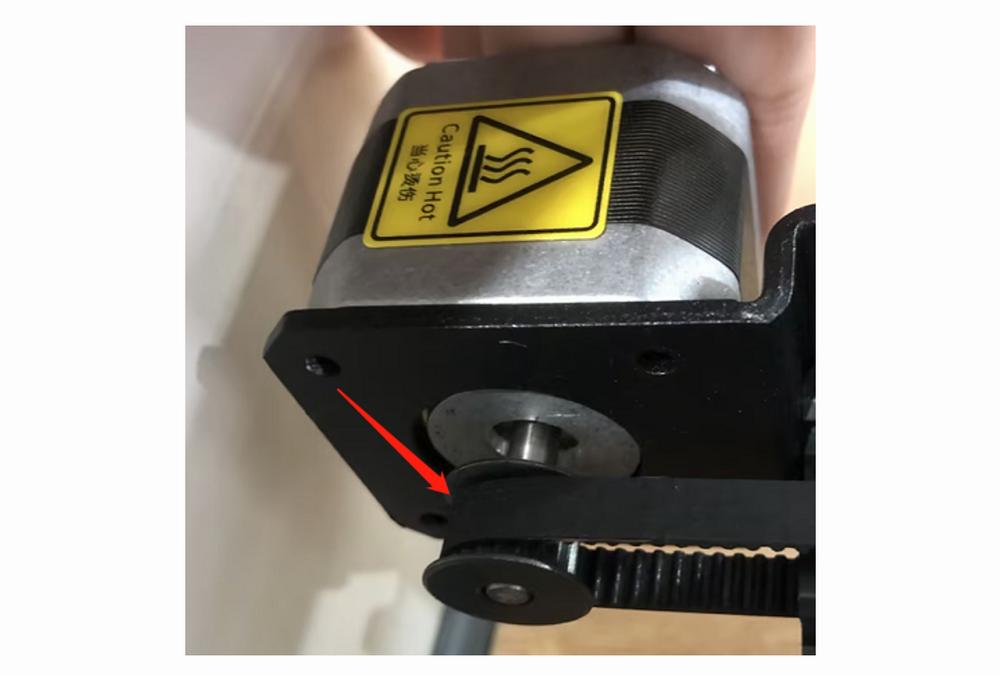
  2. Step 1: Release Y-Axis Belt and Unscrew Motor Pulley:

    • Disconnect your printer’s power.
    • Turn the Y-axis tensioner counterclockwise to loosen and remove the belt from the motor pulley.
    • Unscrew the pulley and remove it.
    • Note: For the Kobra Max, which has long shafts on both sides, loosen belts and pulleys on both ends.
  3. Step 2: Remove Old Stepper Motor from Y-Axis:

    • Loosen both the belts and pulleys as well as the motor bracket.
    • The motor bracket secures the motor for stable printing.
    • Unscrew the screws connecting the motor to the bracket and unplug the motor cable.
    • This will allow you to remove the Y-axis motor.
  4. Step 3: Install a New Y-Motor:

    • Attach the new motor to the bracket.
    • Secure the pulley onto the motor shaft.
    • For models other than Kobra Neo and Kobra Go, align the flat surface of the motor shaft with the pulley screw before tightening.
    • Plug in the motor cable and tighten the Y-axis belt.
  5. Step 4: Test Your Y-Motor:

    • Control the heated bed through the printer display.
    • Observe if the motion position is accurate and whether it runs smoothly on the rail.

For additional motor replacement guides, check out:

A close up of a black metal extruder gear with a red arrow pointing at it.

IMG Source: qpic.cn


Anycubic Kobra 2 Neo: A Budget-friendly High-Speed 3D Printer

The Anycubic Kobra 2 Neo is a budget-friendly entry-level high-speed 3D printer. Let’s delve into its features and compare them with other models in the Kobra 2 series:

  1. Speed: The Kobra 2 Neo boasts a remarkable maximum print speed of 250mm/s, which is five times faster than a regular printer. Its recommended print speed of 150mm/s strikes a perfect balance between precision and performance, allowing you to bring your ideas to life swiftly and accurately.

  2. Other Models in the Kobra 2 Series:

    • Anycubic Kobra 2 Pro: This model is the fastest high-speed 3D printer in the Kobra 2 series. It offers a standard print speed of 300 mm/s and a maximum print speed of 500 mm/s. For context, it completes the 3D Benchy model in just 14 minutes and 56 seconds, which is an impressive 86% time reduction compared to conventional FDM printers.

In summary, the Anycubic Kobra 2 Neo is an excellent choice for those seeking an entry-level printer with high-speed capabilities. If you prioritize speed and accuracy, the Kobra 2 Pro might be worth considering as well.

A 3D printer is printing a red and orange dragon head.

IMG Source: futurecdn.net


Maintenance Guides for Stepper Motors in Anycubic Kobra 2 Neo 3D Printer

Here are maintenance guides for the stepper motors in the Anycubic Kobra 2 Neo 3D printer:

  1. X-Axis Stepper Motor Replacement:

    • Step 1: Safety First – Unplug the power cable from your 3D printer and unload any filament to prevent obstructions during the replacement.
    • Step 2: Remove the Motor – Use an Allen key to unscrew the secure screws on the Z-axis carriage and remove the old X-axis stepper motor.
    • Step 3: Install the New Motor – Carefully align the new motor and secure it in place using the Allen key.
    • Step 4: Test – After replacement, test the X-axis movement to ensure proper functioning.
  2. Y-Axis Stepper Motor Replacement:

    • Step 1: Unscrew Pulleys and Belts – Use Allen keys to unscrew pulleys, belts, and the motor bracket.
    • Step 2: Remove the Old Motor – Pay attention to pulley and motor shaft alignment while installing the new motor.
  3. Z-Axis Stepper Motor Replacement:

    • Step 1: Different Setup – Unlike X and Y axes, each Z-axis motor has an additional Z coupler connecting the motor shaft to the threaded rod.
    • Step 2: Follow Similar Steps – Use appropriate tools to remove the old Z-axis motor and install the new one.

A hand is shown inserting a filament spool into a 3D printer.

IMG Source: qpic.cn


In conclusion, the Anycubic Kobra 2 Neo stepper motors play a pivotal role in the printer’s performance and accuracy. By following the outlined steps for replacing the X-axis and Y-axis stepper motors, you can ensure that your 3D printer continues to operate at its best. Regular maintenance and timely replacement of motors are essential to avoid downtime and maintain print quality.

Remember, each model in the Kobra series may have specific motor configurations, so adapt the replacement procedures accordingly. Make sure to consult the manufacturer’s guidelines and exercise caution while handling and installing stepper motors to maximize the lifespan of your Anycubic Kobra 2 Neo 3D printer.

Comments

    Leave a Reply

    Your email address will not be published. Required fields are marked *