Are you looking to ensure optimal performance from your Raise3D Pro 3 3D printer? One crucial aspect of maintenance is nozzle replacement. A well-maintained nozzle is essential for achieving high-quality prints consistently.
In this guide, we will walk you through the step-by-step process of replacing the nozzle on your Raise3D Pro 3 printer. Let’s dive into the intricacies of nozzle maintenance and explore the best practices to keep your printer in top shape.
Step-by-Step Nozzle Replacement Guide
Replacing the nozzle on your Raise3D Pro 3 printer is a crucial maintenance task. Here’s a step-by-step guide to help you through the process:
Power Off and Cool Down:
Turn off the printer and allow it to cool down. Safety first!
Unload Filament:
Navigate to the Utilities section on the printer’s screen.
Select the nozzle you want to replace (left or right).
Set the temperature to the proper unloading temperature (e.g., 215°C for Raise3D Premium PLA).
Click Unload to start the unloading process.
Pull out the filament guide tube from the extruder.
Gently remove the filament from the extruder.
Adjust Build Plate and Extruders:
Disable the motor in the Utilities section.
Manually move the extruder to a suitable position.
Adjust the height of the build plate.
Remove the Old Nozzle:
Heat the nozzle to 180°C-200°C.
Turn off the printer.
Loosen the 4 screws on the model cooling fan and move the fan away.
Hold the heating block with needle-nose pliers to prevent movement.
Cover the nozzle with an 8mm sleeve and turn it clockwise to loosen the nozzle.
Clean and Prepare:
Use a spatula and tweezers to remove any remaining filament attached to the nozzle or heating block.
Insert a cleaning rod through the hotend to ensure it’s clear of blockages.
Install the New Nozzle:
Insert the new nozzle into the heating block.
Remember, improper nozzle replacement can lead to filament leakage during printing, so follow these steps carefully. If you’re unsure, consider replacing the entire interchangeable hot end directly to avoid any issues
3D Printer Nozzle Maintenance Tips
Proper 3D printer nozzle maintenance is essential for achieving consistent and high-quality prints. Let’s dive into some practical steps to keep your nozzle in top shape:
Routine Cleaning:
Inspect Regularly: As part of your regular printer maintenance, visually inspect the nozzle. Look for any dirt or burnt plastic stuck to the outside of the nozzle or hot end. Unusual sounds like scraping or clicking during printing may also indicate a clogged nozzle.
Pre-Heat Mode: When you’re ready to clean, put the printer into pre-heat mode. Use a brass wire brush or a light abrasive pad to gently scrub the outside of the nozzle. Be cautious around heater or sensor wires to avoid damage.
Why?: This routine cleaning prevents material buildup and reduces the chances of clogs.
Unclogging a Jammed Nozzle:
Despite regular cleaning, nozzles can still clog due to various factors.
Filament Snaps: Sometimes filament snaps in the wrong place and gets stuck in the nozzle.
Troubleshooting: If you encounter a clogged nozzle, consider using a nozzle cleaning kit or a needle to clear the blockage.
Additional Tips for Nozzle Maintenance:
Avoid Abrasive Filaments: Unless you have a hardened steel nozzle, avoid using abrasive filaments like metal-filled or glow-in-the-dark ones.
Proper Filament Storage: Store your filaments in a dry and cool place. Moisture and heat can degrade filaments and cause extrusion issues.
Replace Worn-Out Nozzles: When your nozzle wears out or gets damaged, it’s time for a replacement.
For more detailed information, you can refer to this article on cleaning and maintaining your 3D printer nozzle.
IMG Source: filament2print.com
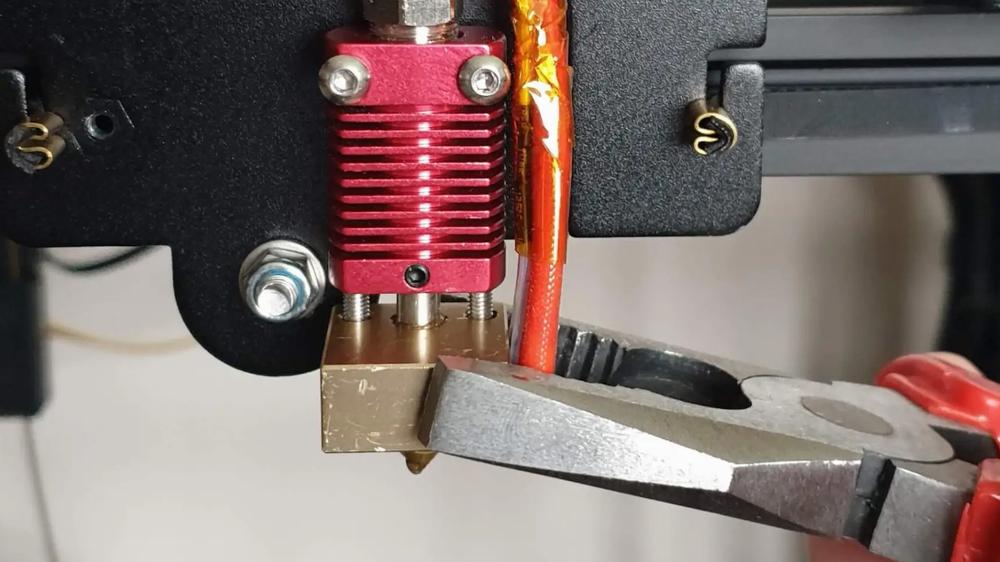
Replacing 3D Printer Nozzle: Step-by-Step Guide
Replacing the nozzle on your 3D printer is a straightforward process. Here are the steps you can follow:
Gather Tools:
Depending on your 3D printer, you’ll need a set of channel locks or a crescent wrench to grip the heater block.
Additionally, you’ll need a wrench to hold the nozzle in place.
Heat Up the Hot End:
Turn on your 3D printer and heat up the hotend. When the heater block, heat break, and nozzle are heated, the metal expands slightly, making it easier to loosen the threads.
Remove any filament that’s currently loaded in the printer.
Remove the Nozzle:
With the hotend at temperature, use the channel locks to grip the heater block (not too tightly, just enough to prevent rotation).
Simultaneously, grip the nozzle with a small wrench and unscrew it clockwise (when looking at the hotend from above).
Once the tension is broken, the nozzle should come out easily. Keep unscrewing until it’s fully removed.
Install the New Nozzle:
Since the new nozzle isn’t hot, it’ll be a bit harder to turn due to its unexpanded threads. Start by hand and then use a tool to finish tightening.
Be cautious not to over-torque the nozzle and damage the threads. You can use a nozzle torque wrench to ensure proper tightening.
IMG Source: futurecdn.net
Choosing Compatible Nozzles for Raise3D Pro 3 Printer
When choosing a compatible nozzle for your Raise3D Pro 3 printer, there are a few considerations to keep in mind:
Thread Compatibility: The threads on the Raise3D hot end are the same as those on the E3D v6 nozzles. Therefore, you can easily use any of the E3D V6 nozzles with your Raise3D Pro 3 printer.
Material and Toughness: Raise3D offers a variety of nozzle materials, including brass, stainless steel, and hardened steel. Depending on your requirements, you can select a nozzle that suits your filament type and printing needs. Here are some options:
Brass Nozzles: These are standard and work well with most filaments. They are suitable for everyday printing.
Stainless Steel Nozzles: These are more durable and resistant to wear. They are ideal for abrasive filaments like carbon fiber or reinforced nylon.
Hardened Steel Nozzles: These are even tougher and can handle aggressive filaments. They are excellent for long-lasting performance with challenging materials.
Nozzle Size: Consider the nozzle size based on your desired print quality and speed. Smaller nozzles (e.g., 0.4mm) provide finer details but may take longer to print, while larger nozzles (e.g., 0.6mm or 0.8mm) allow faster printing but with slightly less detail.
Remember to disconnect the printer from the power source
For detailed instructions on replacing the nozzle, you can refer to the official Raise3D guide.
IMG Source: raise3d.com
Tips to Extend 3D Printer Nozzle Life
To extend the life of your 3D printer nozzle, consider the following practices:
Use a Filament Cleaner Sponge: Regularly clean your nozzle using a filament cleaner sponge. This helps remove any residue or debris that might accumulate during printing .
Perform 3D Printer Flushing: Flushing your 3D printer involves pushing a cleaning filament through the nozzle to clear out any clogs or impurities. This maintenance step helps keep the nozzle functioning optimally .
De-Gunk Your 3D Printer Routinely: Over time, material buildup can occur in your printer’s nozzle. Disassemble the printer periodically and clean out any accumulated gunk. This ensures smooth filament flow and prevents nozzle blockages .
Remember that the frequency of nozzle replacement depends on factors like how often you use your printer, the type of filaments you use, and the quality of the nozzle itself. Generally, changing the nozzle every 3-6 months is a good guideline, but individual experiences may vary
IMG Source: airwolf3d.com
In conclusion, maintaining and replacing the nozzle on your Raise3D Pro 3 printer is a critical aspect of 3D printing upkeep. By following the detailed steps outlined in this guide, you can ensure that your printer operates smoothly and delivers excellent print results. Remember, regular cleaning and inspection of the nozzle are key to preventing clogs and maintaining print quality.
By implementing proper maintenance routines and staying attentive to nozzle care, you can extend the lifespan of your 3D printer and enjoy consistent, reliable printing performance. Keep your Raise3D Pro 3 in top condition by prioritizing nozzle replacement as part of your regular maintenance routine.