Embarking on a 3D printing journey with your Creality CR-10 involves understanding the intricate components that drive its performance. Among these components, the Creality CR-10 Bowden Tube plays a pivotal role in ensuring seamless filament flow and consistent printing quality. Delve into this article to explore the significance of the Bowden tube and discover essential tips to maintain and upgrade it for optimal 3D printing experiences.
Understanding Bowden Tubes in 3D Printing
The Creality CR-10 3D printer utilizes a Bowden tube as part of its extrusion system. Let’s delve into some details about the Bowden tube and its significance:
What is a Bowden Tube?
A Bowden tube is a flexible plastic tube that connects the extruder motor (usually located near the printer’s frame) to the hotend (where the filament is melted and deposited).
It serves as a conduit for the filament, allowing it to travel from the spool to the hotend.
The Bowden tube is crucial for maintaining consistent filament feeding during printing.
Why Might You Need to Replace the Bowden Tube?
Over time, the Bowden tube can wear out, become clogged, or develop leaks.
Common reasons for replacement include:
Wear and Tear: Frequent use can lead to wear, especially near the hotend where the filament rubs against the tube.
Filament Residue: Filament particles can accumulate inside the tube, affecting filament flow.
Clogs: If a clog occurs, replacing the Bowden tube may be necessary.
How to Replace the Bowden Tube on a Creality CR-10:
Prepare: Make sure your printer is turned off and cooled down.
Remove the Filament: Unload any filament currently in the Bowden tube.
Detach the Tube: Unscrew the fittings at both ends of the Bowden tube. One end connects to the extruder motor, and the other end attaches to the hotend.
Replace the Tube: Insert the new Bowden tube, ensuring it’s properly seated in both fittings.
Secure the Fittings: Tighten the fittings to prevent leaks.
Test: Load filament and perform a test print to verify proper filament flow.
Recommended Bowden Tube:
Consider using the Capricorn premium xs Bowden tubing, which is specifically designed for 1.75mm filament and offers enhanced performance .
When printing with flexible filaments, the inside diameter of the Bowden liner is critical for successful prints.
Advantages of Using a High-Quality Bowden Tube for Your CR-10 Printer
Let’s delve into the advantages of using a high-quality Bowden tube for your CR-10 printer
Reduced Friction and Jams:
A smooth interior surface of the Bowden tube minimizes friction during filament movement.
This reduction in friction helps prevent jams and ensures smoother extrusion.
Wide Filament Compatibility:
The CR-10 Bowden tube can handle a variety of filaments, including:
The length and flexibility of the Bowden tube contribute to reducing weight on the extruder.
This weight reduction enables greater precision during printing.
Additionally, it allows for faster printing speeds due to the decreased mass.
Transparency for Troubleshooting:
High-quality Bowden tubes are often transparent.
This transparency makes it easier to identify and resolve issues within the tube.
Remember that choosing the right Bowden tube can significantly impact your 3D printing experience. If you’re considering an upgrade, explore options like the Capricorn Premium Bowden tubing, which offers a slightly wider inner diameter for smoother operation and reduced problems
IMG Source: dhresource.com
Bowden Tube Troubleshooting Tips
Troubleshooting issues related to the Bowden tube in your 3D printer is essential for smooth filament flow. Here are some tips to address common problems:
Proper Setup and Positioning:
Ensure that the Bowden tube is not too close to the extruder or hotend. Incorrect positioning can cause filament jams.
Avoid using too many zip ties to secure the tubeZip tie it correctly to prevent unnecessary pressure on the tube.
Filament Breaks Off Inside the Tube:
If filament breaks off inside the Bowden tube, follow these steps:
Switch off and unplug the printer.
Remove any printer parts that obstruct access to the tube.
Remove the collet clip (usually a blue, red, or black clip) at the bottom of the tube.
Disconnect the connector.
Remove the Bowden tube from both ends.
To reassemble, repeat the steps in reverse order.
Check for Tube Damage:
Inspect the Bowden tube for visible scratches on the inside.
Remove the tube from the print head and feeder side.
Manually push a length of filament through the tube. If you feel excessive friction or obstructions, consider replacing the tube.
Regular Maintenance:
Clean the Bowden tube periodically to prevent blockages. Use isopropyl alcohol to remove dust and debris.
It’s recommended to clean it out every month to avoid clogs.
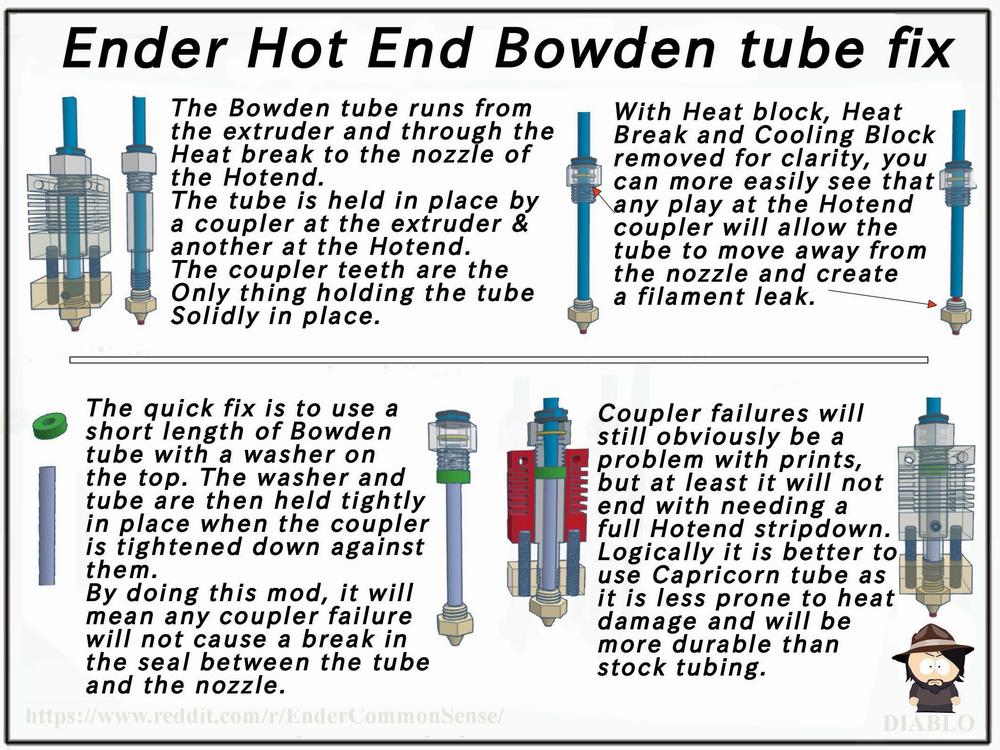
IMG Source: redd.it
Upgrading Bowden Tube on Creality CR-10
Upgrading the Bowden tube on your Creality CR-10 can significantly improve your 3D printing experience. Here are some steps you can follow to upgrade the Bowden tube:
Prepare Your Printer:
Make sure you have unloaded any filament from the extruder.
Turn off the printer to ensure safety during the process.
Remove the Existing Bowden Tube:
Unscrew the coupling that holds the tube in place.
If you are upgrading the couplings, press downward on the plastic piece to release the coupling from the tube and remove it.
Install the New Bowden Tube:
Insert the new Bowden tube into the extruder assembly.
Secure it with the appropriate couplings or fittings.
Ensure a snug fit to prevent any leaks or misalignment.
Calibration and Testing:
After installation, perform a calibration to ensure proper filament flow.
Test your printer by printing a simple model to verify that the Bowden tube upgrade has been successful.
Additionally, consider upgrading to an all-metal extruder to further enhance performance. An all-metal extruder reduces the risk of jamming and tangling, especially when using flexible filaments.
IMG Source: ebayimg.com
Best Practices for Bowden Tube Maintenance
Maintaining your Bowden tube is essential for optimal 3D printing performance. Here are some best practices for Bowden tube maintenance:
Regular Inspection:
Check the surface quality of the Bowden tube periodically, especially if you notice any issues like extrusion problems or the tube slipping out of the feeder.
Inspect both the inside and outside of the tube. Scratches or damage on the inside can affect print quality, while wear on the outside may cause the tube to become loose.
Bowden Tube Replacement:
Markforged 3D Printers: If you’re using a Markforged printer, consider replacing the Bowden tube as part of long-term maintenance. Regular checks help ensure top-quality prints every time. Here’s a brief procedure:
Unload the filament from your machine.
Unscrew the plastic Bowden tube from the print head and remove it.
Similarly, unscrew the tube from the extruder.
Reattach the brass fitting and nut to the plastic Bowden tube.
Ultimaker 3 Printers: Ultimaker recommends checking the Bowden tubes at least once a year. Scratches on the inside can impact print quality, and tubes may become insecure. Regular inspection helps prevent these issues.
Changing/Installing the Bowden Tube:
When replacing the Bowden tube, follow these steps:
Ensure your hot-end is at operating temperature for proper expansion/contraction.
Unscrew the nozzle slightly.
Unclamp the Bowden tube by pushing in on the compression fitting and gently pull it out.
IMG Source: ytimg.com
In conclusion, the Creality CR-10 Bowden tube serves as a lifeline for your 3D printing ventures, facilitating precise filament delivery and maintaining print quality. By embracing proper maintenance practices and considering upgrades with high-quality Bowden tubes, you can elevate your CR-10’s performance to new heights. Remember, a well-maintained Bowden tube is the cornerstone of successful 3D printing with your Creality CR-10, ensuring smooth operations and remarkable print outcomes.